

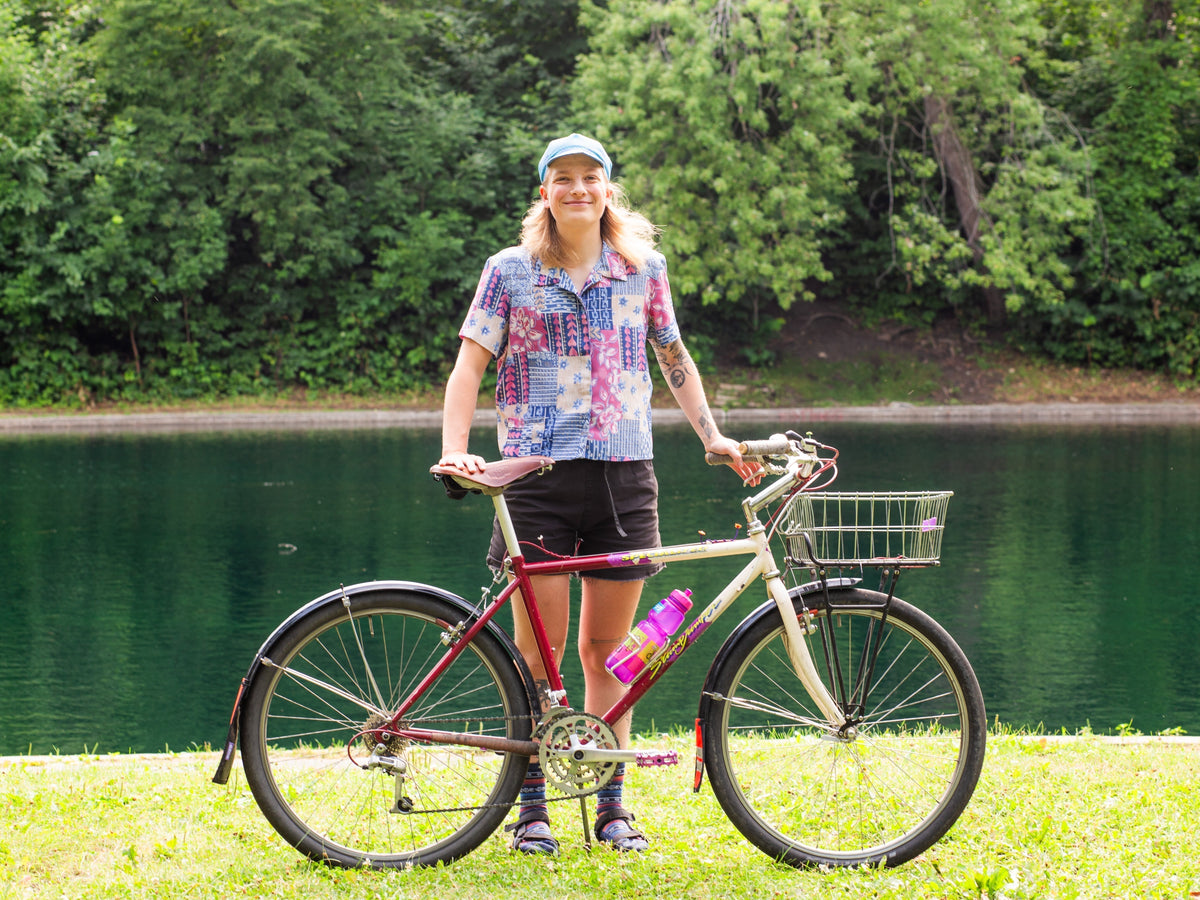
Lauryn's Stumpjumper
It’s a tale as old as time… my first ‘good’ (see: non-hand-me-down Canadian Tire) bike was a vintage 10-speed road bike converted to a single speed. It had 25mm tires and hardly any room for anything bigger. Drop bars, no eyelets for racks or even a bottle cage - simple. Stumps (as I have affectionately named this bike) is the exact opposite. Found on Facebook Marketplace while I was living in Ottawa, I walked an hour in the middle of winter to the seller’s apartment, walked another 20 to the nearest gas station because the tires were empty, PAID for air, and finally, rode it home in the snow. At that point, almost every single component on the bike was original and hardly used. I kept what I could but have made many substitutions over the years. The stem is original, though it came to me painted black. Of course, this simply would not do. I spent one winter afternoon sanding and polishing it to a silver shine to match the rest of the bike. I think it came out great. The long stem was the perfect platform for a sweepy city bar like the Velo Orange Tourist. I’ve long considered swapping it for something even sweepier (let me know who wants to sponsor my moth bar purchase) but for now the Tourist bars serve me well. I kept the original thumbies and they’re maybe my favourite components on the bike. Maybe my favourite component of any bike that I have. They feel great, they’re the perfect shape, they’re so solid, and they shift like a dream. They’re perfect. I’ve never been a big fan of the early MTB moto-style levers that came with the bike, so those had to go. I swapped them out for a pair of Paul Canti-Levers. New-ish on the bike are the Newbaum’s wool grips. We got these into the shop earlier this summer and right off the bat, I knew I had to try them. So far, I’m a big fan. I like the natural look and feel, and the vibe they bring to the bike. They're topped off with wine corks that my good friend found for me. If you look closely you’ll see they have ‘LC’ written on them. A complete coincidence that there is a natural winemaker with the same initials as me, but I love them, they’re one of my favourite touches on the bike. Thanks, Valentin! When I first built up this bike about 3 years ago, I splurged on a pair of red Ultradynamico Mars tires. Not only were they the best set of tires I’d ever had on a bike - they rode like a dream and handled just about every type of terrain with ease - but they were the most visually interesting part of the build. I spent a full two years worrying what would happen when they finally wore out, who would Stumps BE without the red tires?? It was hard to fathom. It kept me up at night. You might not believe me on this point, though I have a feeling that if you are the type of person to be reading this write-up in the first place, you know exactly what I'm talking about. Anyways... like all good things, their time came to an end early this spring. I decided I’d had enough of showing up to work with a trail of mud up my back. I tried to fight it, but if you live in Montreal and bike nearly every day of the year, you need at least one bike with fenders. I had a set in my parts bin, but no matter how many adjustments I made, the Mars rubbed on the sides. 2.333?? Indeed….. Luckily, I had another set of 26 inch tires kicking around that I also love dearly. The Schwalbe Kojaks. As you can imagine from looking at them, they are the smoothest ride you will ever have. They make the road feel like butter. It’s glorious. To be honest, I could go on forever about the ride feel of these tires. But, for everybody’s sake, I will resist. While they are, obviously, very slick, their width gives them a lot of traction and they handle surprisingly well, even in the rain. For me, they are the perfect city tire. Coupled with full-coverage fenders (and some bright orange friendly flaps!), they match Stumps’ life as my daily commuter. No bike of mine is complete without a Wald 139 and a few Ghooost flowers scattered around. The most recent addition to the build are my amazingly purple bear traps. If you look closely they are an exact colour match for the purple accents on the frame. They are the cherry on top of the proverbial sundae that is STUMPS! Photos by Troy @killiskii (you can tell because they're cool)

Converting a drop-bar bike to a Raleigh city bike the long way around
Or: what's with Rossinante, bud? As always, open images in a new tab to embiggen This lovely, completely unremarkable old bike is a microcosm of almost everything C&L does. It started as an inadequate 80’s road bike and wound up basically being a classic Raleigh city bike, a common story for beloved old bikes that are entrusted to us! In between, it’s lived as a fixie, a winter bike, started my touring journey, was hit by cars and had a bunch of its joints re-welded, was re-painted twice and rebuilt so many more times. Some of you can relate to your old bike and its many lives, and others might get inspired for what’s possible by never wasting a frame or component. Come on Rossinante’s journey with me! The same model from Norco's catalogue a few years later, they changed no components between 1984 and 1988. No, I have no idea what tri-moly could mean either. I've seen the gigantic frames for tall people though, they're amazing. This was initially a bike I got as a trade-in for my teenage mountain bike, a clapped-out machine that nonetheless gave me lots of joy on country roads. In exchange I think I paid 130$ (call it 200$ in today's money) for this Norco Monterey from 1984, in original brown paint and with 27-inch wheels, friction shifting, and awful brakes. The awful brakes will remain a theme for a while. Mid-20s Simon on the original-brown bike, with original-bad brake. Rossinante was a good bike for me! It fit me great, looked good, was basically adequate for transportation. When, after riding it for a couple of years in Montreal, it started wearing out, I didn’t really know how to repair it and I’d had bad experiences with local bike shops (not C&L). A friend had this cool new thing called a fixed-gear bicycle, so I decided that sounded like a fun project to try and figure out how to do with my bike. I ordered fixie wheels online from a defunct British discount bicycle retailer, which is how I made my acquaintance with C&L Cycles: our fearless leader JD saw the wheel boxes in the recycling out front of my work and came in to find out which fool had bought wheels from anyone but him. He wasn’t wrong, but we were all young and ignorant once. In its fixie form, I really made this bike give me everything it had! I explored all over the city, went on some inadvisably long day rides, and even started riding in the winter: a friend had the same bike I did, and I saw her ride off into a snowstorm on it. This is when the last of the original parts finally came to an end: old cheap single-pivot brakes do not age elegantly in a salty winter. The cat and the couch are still with me. The Pedalbelts were on another bike that got stolen unfortunately. Sorry Collin! You made good belts! A friend and artist, Laura, who’s an impressive cyclist as well, started repainting her bikes with the good paint smuggled across the border from down south, and I asked her to do mine. Her blue-and-white paint job was fantastic, and lasted for years. This continued to be my winter bike and city beater after I started working at C&L and got a better touring bike, a Bassi Montréal. The homemade paint customization continued though! I stripped the paint, waxed the steel to protect it, and rode the bike raw for a while. This wouldn’t do for winter, so I brought it to the firm that C&L would wind up working with for powder coating, and Rossinante became the first frame that C&L had custom-powdercoated. Back to a simple 1x7 gearing setup, with Marathon tires and plastic fenders, the bike settled into a quiet life as a city bike, light enough to easily carry up the stairs due to its origin as a road bike, but with a much more comfortable upright position with its new flat handlebars, Ergon grips, and a front basket for errands. It’s kind of the natural end point for an old, unremarkable road bike in Montréal. In this form, I traded it to a close friend, who used it just as I had, as an easy to move and lock up city bike, ready for any errand. A couple of winters ago, I had to bring it to JD for steel repairs, which is another tradition for old bikes around here! The seatstays, banged up as they had been by cars, life, and spreading for various hub widths, had both completely detached from the seat tube (so that’s what that creaking sound was…)! He melted some bronze and reattached them, no problem, and at the same time extracted a seized bottom bracket cup. The yellow paint on the frame is where I covered the rust and torch damage. All welded back together and with a 3-speed Shimano Nexus hub that had been through the winters a bit more than it should have... This last year, my friend needed room in his apartment for other projects and this wasn’t his only bike, so he asked me to take care of Rossinante again. I started preparing for another winter together! I’m one of C&L’s internally-geared obsessives, so I had been on the lookout for a vintage Sturmey Archer AW hub for about a year, and since they made millions of them I knew I’d find one. When walking by one of the local bike co-ops, I did a double-take when I saw that an old CCM headed for the scrapheap had one from 1963! A few minutes with tools and it was mine (including shifter), and since this bike hadn’t been used much, the hub was in great shape. I built it into a wheel, filled it with oil, and set out to find out how it survived a Montréal winter. So far so good, and it even shifts when it’s -20° overnight. These older oil-bath hubs can put up with a lot, even if they’re a little dirtier than grease-lubed hubs. The basic maintenance is really simple: when you start hearing the clicky ratchets more loudly, add a tablespoon of oil through the oiling port. It eventually seeps out through the right side of the shell but I’ve found it’s more or less indistinguishable from the general chain-oil/road mess dirt you usually get on hubs. You might notice the brand-new Alfine crankset which doesn’t exactly match the rest of the bike. It happened to be available, with the right tooth count, when my old crank’s arms started dropping off. That’s when you know your crank arms are finished, unfortunately. With its small-ish 42-tooth chainring the gearing on the SA hub is very comfortable! You’re not supposed to go lower than a 2:1 ratio with the cog on these hubs, otherwise you might damage the internals, but right there on the edge is really nice for city riding. You’ve got a middle gear that’s a good cruising speed even on slow slushy days, a climbing gear that’s okay for this city’s hills (if you choose the right ones) and a top gear for false flats and tailwinds. A short little swept-back handlebar like this one or a North-Road bar is really superb in the city. It’s natural to hold when getting on and off the bike all the time and the position is upright so that you can see around you. Plus, of course, it’s easy to handle with mittens. The Wald basket is the heavier but more adjustable 1372, which doesn’t need a rack. I’d be able to carry more with a rack-mounted basket, but this suffices for everyday items. The adjustability makes it really, really quick to install. Keeping the bike cheap but with dynamo lighting was a trickier proposition. I managed to find a bottle dynamo on eBay (new, they still make them but hardly anybody bothers importing them into Canada) which I could mount without rebuilding the front wheel. A hub dynamo is definitely more efficient and useful, but for a quick and dirty retrofit, this thing works. The wiring is dead simple to run, I just wish I had a proper mount instead of P-clamps for the dynamo. The light itself uses the perfect, amazing, never-fails Blue Lug/Nitto mount! The final major bit is something that was just for fun… Obviously you need fenders in the winter otherwise you get, at best, slush in your boots, and at worst salt on everything and everyone. What if they weren’t just regular metal colour though? We sell really easy to use spray paint made to work on bikes, so I could make my bike look really silly! These are Velo Orange fenders. They’re known for their excellent and durable aluminium fenders, but they also make some from stainless steel! The idea is to have more durable fenders where the weight doesn’t much matter, like on a city bike, and the stainless versions are 700x45mm or 26”x60mm, the two sweet spots for common city bike conversions (old road bike from the 80s and old MTB from the 90s). To paint them, it was super fast: a quick scuff sand, then primer, then shortly after the coat of colour paint. The next day when all was dry I used Keirin Flake as the clear coat (it sparkles in the sun!) and it was done! After a couple days’ drying they were ready to install. The clearance is admittedly tight with the 700x30mm studded front tire, but with a little persuasion it worked. So here we finally are with Rossinante: the perfect anonymous 80s road bike of no particular distinction, morphed through a couple of decades of functional tweaks into what people have confused for a vintage town bike. This Spring it’ll have its regular tires back on, but nothing else will change for this beater that’s easy to lock up around town but fun enough to ride that I always want to take it around the neighbourhood. You might have an old bike like this one that might be ready for retirement: give it some cheap love and keep going together, you won’t regret it. As always, thanks our Troy for taking the snowy pictures of me and my ride.

Oli's All-Day Endurance Surly
Open images in a new tab to embiggen Oli's one of our lovely mechanics who mostly works at 75 Villeneuve W. He keeps this a bit close to the vest and I don't know why, but he's probably the one on our team who does the longest rides. Furthest rides would be hotly disputed, but the hours Oli puts on the saddle are impressive. The mess up at the cockpit is legit as heck too, it's what a bike winds up looking like after days and weeks of riding nonstop. The Details (just the facts, please) Hot mayonnaise 2018 Surly Midnight Special in its allroad, long distance, minimal sleep iteration. 27.5 wheelset build with Sram 900 hubs laced on Sun Ringlé Inferno 25 rims with Sapim Race butted spokes. Dura-Ace 11-speed shifter (1st Gen), Ultegra RX rear derailleur with Wolf Tooth DM modification, XTR front derailleur, Truvativ XO carbon crankset with 28x42 BlackSpire chainring, SRAM Force 11-36 cassette with Shimano 11-speed chain. Wheels Manufacturing BB, Cane Creek 40 headset. Salsa Cowbell 44cm handlebar, Thomson seatpost and stem. Brooks Cambium Carved C15 saddle, Shimano XT pedals. Profile Designs T2+ Aero extensions. Bags: Revelate Designs Terrapin 8L seatpack, Restrap long top tube bag, Gurp stem bag, Revelate Designs Pitchfork aero extensions harness, Wolftooth downtube toolbag. Thanks for showing us the bike, Oli! Write in to his attention if you've got questions about long endurance cycling.

Cory's Albion-Blue Raleigh
I’m not a 26er guy. I’m not even a mountain biker in any way, really. If you know me and my bicycle *ahem* preferences, then you know my heart lies on the road. 700c x 28 is a wide tyre and I’ll die on that hill. Before I got this bike, it’d been about seven years since I’d ridden anything other than Campagnolo. So, yeah, this Raleigh is a bit of a departure from the norm for me. I bought the bike from a friend / old C&L colleague who hadn’t been riding it enough, just after moving to Montréal from England. Knowing I was flying into Toronto, then driving up to Montréal with a car already loaded with furniture, I didn’t think it prudent to bring one of my bikes from the UK with me. To hell with it, I thought, I’ll just build myself a road bike as soon as I get there. The reality is, though, that it’s difficult to justify building a bike which is practically the same as another bike you already have - even if that bike is 3000 miles away. So, I thought why not get something that I don’t already have? Why not do something a little different? Why not do something a little more C&L? At first, the Raleigh had some Velo Orange rando drop bars on it, and bar end shifters. I rode it like that until winter hit (I’m not yet culturally immersed enough in Québec to ride winters, but it’s coming). For spring, I knew I wanted to change it up: add some flat bars and thumb shifters. Everyone had been raving about the KT bars to me for ages so, though I hesitated between them and the new Nitto Bobby bar, I really had no choice but to KT up my bike. Reusing the Silver2 shifters from the bar ends in the XO Rivendell thumb mounts was a no brainer. I whacked some Dia-Compe SS6 brake levers on there and Bob was my proverbial uncle. The only shame was that they’re not the blue ones from Blue Lug - I had previously put some of their green SS6s on a ‘the theme is Green’ bike - the rest of the cockpit is blue enough as it is. My green Sim Works Bubbly pedals actually found their way from that bike to this, and although I love the bearings on those things, they’re one part I really wish did come in blue. Speaking of blue, the grips are some nice Lizard Skins that a UK online bike retailer mistakenly sent me instead of green a couple of years ago (no prizes for guessing which bike they were meant to be for) and by the time I tried to return them, the retailer had gone bankrupt and into administration, so the grips went into my parts bin, until they found a home on this Raleigh. The bike is honestly a bit janky. My cables are frayed; the grips are now worn down and the Velo Orange mud-guards that I’ve reinstalled since this photoshoot are bent and buckled. But that’s just the way I like it. I don’t want it to be a bike that I’m overly fussy or prissy about, just a bike that rides fine and has a bit of character. This is the first time I’ve gone to the dark side of friction shifting and I’ve been happily proven wrong about its shortcomings (if your gear slips you have no one to blame but yourself). I still maintain that indexed is king but hey, it gets the job done. Over the summer I’ve taken the Raleigh on a couple of longer rides / overnighters / camping trips and it has seriously surprised me with what it can handle. I didn’t expect it to be so nippy on such a wide range of terrain, but it performs decently on asphalt, gravel and mud alike. Even under load it gave me some serious action. When it comes to load, I’ve really fallen in love with the Carradice Cadet saddle bag and the Bagman QR bag support. The bag is a veritable Tardis: I’ve never once found myself lacking for space, no matter how much I put in it. Sleeping equipment, food, repair kit - the whole shebang. The quick release function on the support just makes my life a bit easier since I can just unhook and go without fussing and fiddling with leather straps. Anything that reduces faff is a win in my book. The Carradice also gives me my absolute favourite thing about the bike: my Albion pendant. If you know me, you probably know that football (it’s not soccer) is my religion, and Brighton & Hove Albion are my vengeful God. They’re my hometown team. Sometimes we’re fantastic, sometimes agonisingly dreadful - just like my Raleigh! Also just like the Raleigh, the team’s colours are blue and white, which made for a perfect base for an Albion themed bicycle. Photos by Troy @killiskii

Julian's Miyatas
The bike that instigated my cycling interest, then obsession; employment, then career, was my dad’s 1988 Miyata Team. He bought it new in that year, and 20 years after that I uncovered it in my parents’ basement. This is exactly the same time I started daily poring over my favourite online outlets and blogs, with Trackosaurus Rex, Fyxomatosis, Bike Snob NYC, and of course Prolly is not Probably as my go-tos. It’s a special bike for me because it started it all, especially all these years later with my current life and livelihood in the cycling industry. The Team-Miyata is an excellent ride - the top end of their lineup in 1988 and for a few years before and after. Miyata, who also manufactured rifles, used that technology for their proprietary triple butted splined chromoly tubes, claiming that those splines that run along the inner walls of the main tubes increase stiffness and strength and allow for weight savings through thinner wall thickness. It makes sense! The bike is sportier than anything else I’ve ridden, the rear triangle is stiff, and it’s dreamily comfy. The build is great too! I don’t know if Dura-Ace 7400 is my favourite groupset because of this bike, or rather that I like this bike so much because it has Dura-Ace 7400, but they fit together perfectly. The satiny-smooth polish is so perfect, the crankset is beautiful, and it shifts wonderfully. I chose to modernize a few components here and there while keeping as much of the original spec as I could. I love a Selle Italia Flite, so that had to happen. I mainly ride touring bikes, so a super-short Nitto Technomic and 44cm Noodle bars got me to the upright spot I wanted, along with moving the shifters up to the bar-ends with these Rivendell designed Dia-Compes. Tubular rims aren’t for me, but I think I got as close as I could with lightweight H Plus Son Archetypes and the smooth, smooth Rene Herse Cayuse Pass tires. I repurposed the old race number braze-on as a bell mount for my Crane Suzu. Then I got hit with a plot twist. Through those endless hours of scouring the bike internet, I came across this fun database of Miyata catalogs almost 10 years after I started riding the Team road bike. Turns out Miyata made a very direct counterpart of this bike, but for mountain biking. I needed it! I set up an alert on eBay, and soon enough one popped up and I picked it up. Meet the Ridge Runner Team! With the exact same paint job, and Miyata’s same proprietary triple butted splined Chromoly, it feels like putting these two together is reuniting estranged twin siblings. It’s got the equivalent top-of-the-line groupset, Deore XT, and only required a few upgrades to get back in shape. I swapped out the dried and cracked tires for Fairweather’s For XC, which are surprisingly fast, quiet, and comfy. The handlebar needed to be my favourite ever, the Crumbworks-designed Nitto KT Bar, which has the added advantage of getting me more upright. I’m really thrilled to have these two together and to ride them back to back. They feel like the museum pieces of my stable, but are also so pleasant to ride. The recent restoration articles on The Radavist have been super inspiring in the process of tuning these two back up, and it really feels like full circle from back in 2008, the year I got the Team road bike and started reading Prolly! Kyle at Tracko's community emphasis and Andy at Fyxo's build galleries feel very much a part of all this, too. The cherry on top of this project is that my friend James, who I of course met through bikes, heard about my blue and yellow Miyatas at the Philly Bike Expo. A couple months later, I got some surprise mail with this perfect match of a Miyata cap - thanks James! Photos by Troy @killiskii

Alex's Bianchi Sport Touring
Alex, a workshop manager at our Rachel street store and our in-house Spray.Bike paint expert, tells us the story of his Bianchi road tourer. It’s a great example of the kind of restoration and paint work we do at C&L, so get in touch if you have a similar project you’d like us to help out with! 6 years ago, when I first moved to Montreal, I left a lot of my belongings behind - including my car and my bicycle. Although the REV was only a project at that point, and Saint-Denis street’s 4 lanes of cars weren’t exactly bike-friendly, it was still clear to me that riding bicycles was the best way to get around town. At the time, I was getting involved in community DIY workshops for bicycle repair, and it was at Mile End Bike Garage that a volunteer remembered a too-big Bianchi was sleeping in the back of a closet. A few days later I bought it, but it wasn’t until later that I understood the value of this rare gem that was exactly what I wanted and needed. Designed by Bianchi, made in Japan, and sold exclusively in Canada, the “Sport Touring” model is, as you might expect, a sporty cycletourist frame. With a compact geometry and CrMo tubing, it’s light, nimble, but also very solid and capable of carrying lots of luggage without much rear-end flex. Originally mainly equipped with Japanese components (Sugino, Dia-Compe, Suntour, etc.), I wanted to keep the original spirit of the bike with most parts designed or manufactured in Japan. Nitto, Shimano and Dia-Compe are the brands I chose for the majority of the parts. These new parts allowed me to fully modernise the bike to my fancy, with a 3 by 10 indexed transmission using brifters as dialled as a well-tuned piano. Of all the available groupsets, Shimano’s Tiagra checked all the boxes for the perfect drivetrain, and it’s been working perfectly with great precision and smoothness. My bike also features Tange, MKS, and H Plus Son parts which are also of the highest quality, which is confirmed by their smooth running after years and kilometres of use. Of all the parts on this bike, my favourite are the MKS pedals that immediately smoothed out the pedaling from the first spin of the cranks, the Nitto seatpost that has such beautiful finish and lines, and the René Herse tires with the perfect balance of comfort, lightness, and speed (but especially comfort!). Because the frame has a chromed rear triangle and fork, and because the original paint wasn’t properly adhered to that chrome from the onset, there wasn’t much paint left when I bought the bike. This was the perfect opportunity for me to practice paint and to restore it to its youthful splendour. Because I particularly liked the original colour (a sort of British Racing Green, but a little colder than that old classic), I compared dozens of similar tones before choosing the one that matched it the closest. I then thoroughly enjoyed repainting the frame and building it up with its new components. Since I’ve had it, I’ve taken it on several trips (Vermont, Saguenay Fjord and Lac Saint-Jean, Waterfront Trail, etc). I equipped it with several bags with lines that work just right with the frame and have been very useful and functional both on tour and in town. Two years ago, while I was preparing for a trip to Nova Scotia, a few months before departure I noticed two cracks at the junction of the fork blades and crown, which tolled the bell on a long life of adventures since its manufacturing in the late 80s. After that East Coast adventure with a replacement fork that broke after three days (that’s another story), the bike was treated to a new custom made fork that is just right. This new fork was built by Spleen Cycles. We chose the components together and conceived it for a heavier-duty touring use case, while keeping a classic aesthetic that matches the frame and the rest of the bike. And since I still had some paint, I was able to colour match it for a perfect finish. You might’ve noticed that the handlebar is no longer so straight: A city work truck clipped it with its trailer when pulling out of a parking place. I contacted the city and that led to nothing, so I’m left with a flare on the right side that somehow appears to be the original design of the handlebar. I wasn’t too bothered, so rather than replacing it, I plan on bending it identically on the left. It might be the only Nitto compact drop bar with a flare! Down the road, I expect to eventually lace up a dynamo wheel, mostly to fix my too-often issues with forgetting to charge my lights. Photos by Troy

Vince's Mutt
In the winter of 2023, Jean-Daniel and I went to Tucson, Arizona to take a framebuilding class with framebuilder Dave Bohm of Bohemian Cycles, and this is the frame I made during that class. It’s basically a Hog’s Back with a few tweaks. At the time, I didn’t have a need for a specific type of bike I didn’t already have (I know I know, n+1 blah blah blah), so I thought it would be a good exercise to start from a bike I know very well and make subtle changes to see how big of a difference it would make. I think I’m a bit of an empiricist: even though I read just about everything that exists on framebuilding, I still have to test it myself to really believe it, or really understand it at least. Since building the frame I’ve only had the chance to use it in its intended environment on a handful of weekenders. This winter, though, I was lucky enough to go test it on 800km of Colombian trocha (the common word the Colombians use for their dirt roads). So, two years later, I’m glad I can finally give it a proper review and assess how different it is from the Hog’s Back. To begin with, there wasn’t much I wanted to change from my beloved Hog’s Back. A couple of millimeters here and there to better fit my body proportions and a switch to thru-axle and adjustable dropouts were the main modifications I had in mind when designing the frame. Then I wanted to experiment a bit with one aspect of frame design that still feels a little esoteric to me, and that is front-end geometry. The Hog’s Back, with its relatively low trail measurement (63mm or so?) always felt a tad twitchy when unloaded, but very stable with the slightest weight at the front. But then most bikepacking bikes nowadays tend to have longer trails, closer to mountain bikes. I was curious to see what that was all about, so for the Mutt I decided to go with a slacker 70deg head tube angle, which bumps up the trail to 80mm, with the fork having a similar rake to the Hog's Back's. Then the slacker head tube paired with the slightly steeper seat tube allowed me to lengthen the reach (and, by extension, the front-center) to accommodate my long arms. This also resulted in a bigger front triangle for a framebag, despite the lowered top tube. The rear got a little longer too, mostly because of limitations in chainstay options, now going from about 445mm to 460mm. Those few alterations made the bike considerably longer, with the wheelbase clocking at 1128mm with the dropouts at the rearmost position. What do all these numbers mean when riding the bike? Let’s just say some changes I feel were for the best, while others not so much. First off, I don’t think I’m a fan of longer trails after all. Although the bike does feel more stable, I did notice it’s a little slower to steer, and the front wheel tends to be floppier when climbing. Is it drastic? Not really, I easily got used to it, but it’s enough of a difference for me to know that I prefer low(ish) trails. That being said, the bike felt incredibly stable bombing down those dirt roads, probably thanks to both the high trail and the pretty long wheelbase, and still felt nimble when needed. The longer rear-end didn’t seem to bother me at all. The rear wheel did slip a couple of times when climbing standing up, but I think it had more to do with the steepness of the hills rather than lack of weight on the rear wheel. And I don’t know about you, but if I'm climbing for two or three hours straight, I much prefer staying seated anyway. I guess those few lil’ “experiments” turned out pretty conclusive, in the sense that I learned a bit more about what I like and don’t like. In the next iteration of this frame the goal would be to maintain a similar wheelbase with a lower trail, probably by simply increasing the fork rake. In terms of features, I already mentioned the switch to thru-axle, which I’m very glad I did. While I don’t consider it to be a big deal, disc brakes with QR’s are a bit of a hassle, and I noticed less disc rubbing in the front when pedaling standing up. I opted for Paragon Machine Works adjustable dropouts because I always like to have the option of going singlespeed. I put pretty much all the eyelets you would expect for a bikepacker, and even tried fitting cargo cages on the seatstays but the result isn’t very convincing. They don’t have quite enough heel clearance for anything bigger than a normal water bottle, so I never really use them. Now on to the tubing. The steel tube selection was limited by what Dave had on hand and what could be ordered last minute. The tubing for my frame ended up being a mix of Dedacciai and Velospec, nothing too fancy, with tube profiles pretty similar to the Hog’s Back's Cromor. Except! The fork blades are from the prestigious Reynolds 853 heat-treated series, paired with a Pacenti crown. The heat treatment on the blades makes a noticeable difference, making them extremely stiff yet somewhat lightweight. The complete frame turned out to be noticeably lighter than a Hog’s Back even though it is a bit bigger and has more steel, the fork probably being the main reason for that weight loss. While riding loaded, the frame felt quite comfy and compliant, without feeling squiggly, which is usually the perfect in-between you’re looking for. In the end the frame came out mostly the way I expected it. The whole process of designing the frame and building it really gave me a better sense of how different parameters impact each other and what problems you can run into and what solutions are available. Dave Bohm offers classes for all three main methods of joining steel tubes: Tig-welding, fillet-brazing and lug construction. Since I already learned the basics of Tig-welding in trade school I decided to take the fillet braze class. While most of the frame is fillet-brazed with bronze, the seat tube sleeve and fork crown allowed me to learn a bit of lug-work and brazing with silver. The rear dropouts even called for nickel-silver to be used. At first I wanted to leave the fillets raw, as I am a big fan of that look, but Dave said they need to be extremely well done for him to let students get away without filing, which is… fair. It takes time to achieve beautiful raw fillets and filing is as much a skill to learn as brazing is. I find brazing to be very pleasing to do. To me it feels less stressful and more forgiving than Tig-welding. It also has that kind of romantic feel to it, more old-school and “artisanal”. There is just something about working with an open flame, and the look of those fillets, raw or filed, that speaks to me. I think both joining methods have their benefits and their applications and I’m glad I got to touch both. Now, it took a while but I finally painted the frame last spring, using Spray.Bike. Although it didn’t pan out exactly how I imagined it, my original inspiration for the colour palette was the album cover of Feeding the Abscess by Martyr, one of my all-time favorite death metal albums. Then my friend Kellyann graciously made the amazing “Mutt” logo for the downtube. It all pairs really well with my custom Gurp olive framebag, which I absolutely love. Someone I met on a group ride said the bike is giving Mad Max vibes, which made me sooo happy because that is literally the aesthetic I’m going for. I tend to see bikes as these long-lasting, highly functional and practical machines that are made to survive through the (post-)apocalypse. Now a little about the build, since some of it has changed or been thoroughly ridden out since my first write-up about my original Hog’s Back build. Thanks to hub adapters, I really just slapped all the parts onto my Mutt. My Hog’s Back had flat bars for the longest time, but I eventually realized I’m more of a dropbar kinda guy for all things touring and bikepacking. I wanted to see what all the hype was around the Crust Towel Rack, and after riding ‘em for some time I totally get it! The handlebar is very comfortable and has so many different hand positions, perfect for all-day riding. Since I’m a little picky about handlebar position, I had a custom stem made by WZRD in BC to have the bar exactly where I want it. Although there were moments in Colombia where I thought a flat bar would’ve been better suited, the wide dirt-drops never really felt like an hindrance to me and I actually liked having them on those few paved sections where I could really tuck in. Next, I switched out a couple of things on the wacky drivetrain I had going on. I found this cool Sunrace derailleur, which is the cheapest wide-range derailleur you’ll find (can do a 51t cog), and has a normal Shimano 9spd pull ratio. These are all great features but the derailleur really showed its limitations during the trip. It ended up needing almost daily adjustments to be able to reach the granny gear, the main problem being the pivots getting very grindy and needing constant lubrification. What didn’t help with that situation was the Rivendell shifter also got extra grindy. I assume the swings between extra wet and extra dry conditions were tough on the ratchet and ended up washing out most of the lubrication. It's probably not anything a good overhaul can’t fix! I’m still running the same gear ratio, 36t chainring with a 10spd 11-46 cassette, which proved to be very adequate for me, even in Colombia with 1500-2000m of climbing per day. A lower 32t chainring probably wouldn’t hurt, but I liked having a usable high gear for slight downhills or flat paved sections. The rest of the build is pretty much the same. My Klampers are still going strong, except for a little mishap right before leaving where the moving pad adjuster somehow completely stripped. So for the trip I rocked a BB7 at the back while waiting for a replacement part from Paul. “Honestly, can you see a difference?” Eh, a little. My experience with BB7 is that they have very little modulation, meaning you don’t need much to lock the wheel, which can be good at times but which I generally don't like. The Klampers have more modulation, although maybe less initial braking force. Whatever, they’re brakes, they stop. Then the wheels have… survived. I think I reached the limit of the “lightweight” Velocity Blunt SS (a racing rim, not a touring rim, as evidenced by yet another of Vince's famous mechanical mishaps —ed.) at some point through the trip by punching a dent so bad the rim cracked a little. Somehow the tire still holds air and sealant and it didn’t keep me from completing the trip (although I did inflate my tires a bit more and was a little more careful on downhills after that). Oh right, I also replaced the tire before going to Colombia, trying out Vittoria’s Barzo and Mezcal combo, in 2.3”. They felt perfect for that type of road, quite grippy without being overkill for softer surfaces. Another mishap during the trip happened to my bottom bracket, where a few ball bearings got all squished. I was expecting the IRD Tenacity open ball bearing BB to be a little tougher than that, although as some people pointed out, caged bearings aren’t as tough as loose ball bearings since you have less support. But the beauty of serviceable bottom brackets is that I just had to hitchhike to a bike shop a couple of towns over. Fresh grease and new ball-bearings were all I needed to keep going. I’ll keep the bottom bracket like this and see how the loose ball bearing theory holds up, otherwise I might switch to a good quality sealed BB. Lastly, my dynamo setup has been less than satisfying, partially by my own fault. I already had to replace the dynacoil on my Kasai FS dynamo hub after only a few years of use, but while looking into that replacement I stumbled upon the manual that very specifically says the hub should never be submerged in water, which happened repeatedly during my time living in the Maritimes. Oopsie! Then the Kasai Trailbeam light was rather disappointing since the beginning. The beam isn’t very bright, and the micro-usb port makes it almost impossible for the cable to stay in. Then the light just completely stopped working during the trip, which I know also happened to other people with much less km’s on it. All in all, the Mutt was an absolute joy to ride throughout the trip. From mountain bikey rock slabs to loose sand roads and fast paved sections, the bike felt capable of taking on any type of terrain. Not only was it very stable and capable, it was also extremely comfortable. I think this comes down to the combination of many factors: the frame geometry, the tubing, low-pressure tubeless tires, wide flexy handlebar, all this contributed to the perfect plush ride for those long 1-hour rocky downhills. The various mishaps somewhat confirmed some of my choices in components, as all of these issues were easily fixed or endured as minor annoyances. My brain is already full of ideas for the next version of this bike. That's one of my favorite thing about framebuilding and frame design: learning, tinkering and improving. Hopefully I’ll be able to get to work on that soon enough, although I also have plans for a few other frames that may come before. Bikes are cool, and building them is even cooler! Pics by Troy

Leo's Landyacthz CB MKII Dad Bike
Before being manager at our Villeneuve shop, Leo lived in Vancouver and worked at Landyachtz HQ. He brought it with him when he moved to Montreal as a cherished souvenir of his time out West. It served him very well, and became his daily ride especially when he needed to drop off or pick up his daughter from daycare. The CB MKII's Columbus Cromor frame and carbon fork made it a solid yet fast commuter. He didn't change much from the original spec which featured Mavic CX wheels, Sram Apex 1x11 drivetrain and Sram Level T hydraulic brakes. He did however swap the bars for the Tumbleweed Persuader as soon as the first batch of them arrived at the store. The high rise, comfortable backsweep and generous width made handling with his precious cargo at the helm that much easier. Unfortunately, his Landyachtz would not be long for this world. It met its unfortunate demise after a high speed collision with an electric Bixi during last year's Course Des Morts. We'll be sure to post his replacement Dad Bike when the time comes! Pics by Troy

Roberto's Coyote
I originally built my Coyote for last year’s Philly Bike Expo and have ridden it extensively since! Photo by Troy The combination of single speed, cable-actuation, and a square taper bottom bracket with boost spacing, tubeless tires and a dropper post felt like a good representation of me as a cyclist: keep it simple where possible, embrace newer tech where I feel like there’s a real value-add. This bike has been a ton of fun rambling through trails fast and slow. I love the XC feel of narrow (by modern standards) 2.2-2.35” tires with a slightly longer stem. Set up single speed, the short rear end and rigid frame make the Coyote feel extremely playful and agile. It’s the most light-footed I’ve ever felt on a bike. The super precise steering, and the increased rollover of 29” wheels mean I can pick the correct lines with little effort and float over things instead of smashing through them. The frame’s stiff front end means the Coyote effortlessly sticks to the line I point it down. The trip I’d been itching for a proper bike tour for quite some time. A Winter bikepacking escapade in South America, to be exact. Julian, Vince, Rob, Peter, Dan, Juan and I set our sights on riding the Oh Boyaca! route found on bikepacking.com during the first three weeks of February. We decided to ride South to North, opposite to the direction it’s mapped in the link above. The route took us through stunning high-altitude scenery, in biomes specific to that part of the world called páramos and characterised by a kind of shrub called frailejón. With our days averaging about 1200m of climbing (with a couple >2000m days), we got to see the scenery, foliage and temperature range from hot and tropical to cold and tundra-like in a matter of hours. Temperatures would vary by at least 20ºC from the start of the climb to the summit. Most of the mountains we crested were enveloped by rain clouds. Despite limiting our surrounding views the cloudy atmosphere (and the hail that accompanied one of the summits) only added to the mystique of the terrain. A couple of days were spent riding through scorching hot desert-like landscapes, which reminded me a lot of the Northern portion of the Baja Divide I toured five years ago that inspired the Coyote’s design. Colombia loves cyclists! It’s no secret that Colombia takes pride in its cycling heritage. We were always made to feel welcome on the roads and in the tienditas. So many people we spoke to were clearly proud of their land and insisted that we tell everyone we know to go to Colombia for a bike trip. So, take this as your sign! The route took us through mostly quiet and remote areas where car traffic was virtually non-existent. But even the odd stretches of pavement felt safe to share with the generally courteous drivers and truckers. Finding a place to camp was always shockingly easy. All we needed to do was ask. Even in restaurants, people would stop mid meal to make phone calls to help us lock in a place for us to stay. Food! On top of delicious fresh fruits, bocadillos and empanadas, the culinary highlight of the trip is easily the classic Colombian breakfast we enjoyed every morning: Beef rib soup accompanied by a serving of eggs, an arepa (made of wheat or corn flour depending on the region), cheese, hot chocolate, and coffee. The super salty, fatty, and electrolyte-filled broth gave us what felt like superpowers! You’ll notice that a stove and fuel are missing from my pack list below. Food was always very easy to find and guaranteed to be way better than any camp meal. The ride To get my Coyote ready for this trip, I simply swapped the single speed cog for a MicroSHIFT 11-speed XCD group, topped up the sealant in both tires and called it a day. The bike performed marvellously. I was extremely comfortable day after day, in large part thanks to the 29” wheels’ increased rollover and, of course, the Bobby Bar handlebars. I love the long grip area that allows me to move my hands around throughout the day. The 30º angle feels very natural when on or off the saddle both while climbing and descending, and the bends provide a comfortable and efficient-feeling perch for spirited efforts on paved roads. (BTW, check out the Nitto-made ø25.4mm version of the Bobby Bar!). The Coyote's stable and predictable handling almost made it feel no different to how it rides unloaded. Those attributes were particularly welcome on some of the longer, gnarlier descents that would've been way more exhausting if I had to also wrangle a rowdy, unbalanced bike. I even rekindled my love for replaceable derailleur hangers (what?). Yes. I unfortunately took a spill. It happens. On one particularly long descent (about 50 minutes to an hour) in the rain and dwindling sunlight, my mind wandered for a second and I totally cooked a corner. I was fine, save for some minor cuts and bruises, but my derailleur hanger got pretty badly bent. Thankfully, I was still able to finish the descent into town. The following day, instead of messing around with a pair of pliers to try to make it straight, I simply swapped it with the spare one I was carrying and voilà! I didn’t even need to adjust the shifting in the slightest and everything was like new again. Replaceable derailleur hangers for the win?? Packing style Every style of pack has its trade-offs and choosing the right one is as much about the terrain you’ll be riding in as your personal preferences. While bikepacking bags are generally lighter and more secure than panniers, their limited capacity can be a challenge and having to play tetris with your gear when packing up every morning can get old, quick. Panniers benefit from bigger volumes which require less care when packing, but their hardware can break, they flop around on rough terrain and can sometimes fly off. Below is my pack list but in summary, for this trip, I enjoyed having camp related things (i.e. things I didn’t need access to during the day or even during hotel stays) in the compressed seat pack and fork bags. Almost everything else was jammed into my Atelier Atwater Grafter XL handlebar bag. The expandability of the Grafter made it possible for me to use it almost like a pannier by being a little faster and more careless about packing strategy. Small accessories and snacks were shared between my frame wedge, top tube bag, stem pouches and hip pack. Pack list Here's all the stuff I brought for our 12 day trip and how I carried it. Atelier Atwater Grafter XL handlebar bag I originally bought this bag for our trip to Asia, and it’s the bike bag I use the most now. The XL size and its expandability offered a huge volume, and plenty of room to stash my waistpack when I got tired of having it on me. The D-rings made it possible to attach a shoulder strap and use the bag as an only slightly weird looking carry-on. Clothing Rain jacket Pants Socks Underwear Alternative Research (co-owned and operated by former C&L staff Emiliano!) Merino wool t-shirt, sewn and naturally dyed in Montréal Long sleeve base layer Toiletry kit First-Aid kit The rest was stashed in the side pockets: Beanie Thin gloves Merino wool neck gaiter Mini folding lock Headlamp Utensils Fork Bags I made these for our trip on the Transgaspésie route out of Cordura and truck tarp for maximum abrasion resistance and waterproofness. For that trip, I needed a bag for all my food that was easy to take off the bike and hang from a tree to keep away from hungry critters. They’re great for riding over rough terrain when fully compressed and cinched tight with Voile straps as they don’t move or sway in the slightest. One contained: Sleeping bag Insulated jacket The other: Sleeping pad Camp towel Base layer bottoms Inflatable pillow Sleep mask Lightweight fleece sweater Custom Gurp 12” top tube bag Friend Gurp made me this custom footlong top tube bag that has served me very well. It’s cleverly designed, and the quality is top-notch. It looks entirely like new but for the mud stains. Despite having had it for about 3 years, I’m still surprised by just how much I can fit in there! Go here for more Gurp! Sony RX100-V camera 20,000mAh Battery bank. A smaller 10-15,000mAh would’ve been enough. Cellphone Earbuds AirTag Resistant Bags frame wedge We met Shinichi who runs Resistant bags during our trip to Japan and he very kindly gifted Julian and I each a frame wedge! The tapered shape gives it plenty of volume without getting in the way of my thighs and is beautifully made of X-Pac material. It has replaced my waistpack on all my local rides. Tool kit: Multitool Tire lever Pump Chain oil Sealant Tire plugs Quick-links Gorilla tape Needle and thread Lots of zip-ties TPU inner tube An assortment of spare Voile and nylon straps Tent stakes Atelier Atwater stem pouches I got these for the Baja Divide 5 years ago and they’re incredibly convenient for storing snacks and water. As someone who sometimes lacks fueling discipline, having food and drink in sight and within reach helps me a lot. Snacks (mostly bocadillos) Water bottle Leatherman. Maybe the best gift I’ve ever received. I use it every single day at work and on tour. To each their own but I’m a devout Free P4 guy. Swift Olliepack seatpack This was my first time using this kind of seatpack and I really liked it. The attachment and compression system kept swaying to a minimum and provided a way of strapping either my sandals or my shoes on either side. Being on the small side for a seatpack, it fit my 2-person tent with no room to spare. Tent body and fly Spare derailleur hanger in the underside mesh pocket Sandals or shoes strapped to the sides Waistpack: Passport Wallet and cash Sunglasses case Sun screen, hand cream, lip balm Not bagged Tent poles strapped under the downtube thanks to Problem Solvers Bow Ties and those incredibly handy Velcro straps that come with Surly tires. Therm-a-rest Z seat, which doubled as a bumper between my headtube and handlebar bag, and as padding in my bike box. I never actually used it as a seat… at least it was helpful for other uses and weighs next to nothing! Build list Here’s a breakdown of the build: Frame & Fork: Bassi Coyote M (19.5”), Stargazing Blue Dropout bolts: Stridsland M8 Headset: White Industries EC44 / ZS44 Stem: Sim Works by Nitto Rhonda 80mm Spacers: Sim Works by Nitto Handlebars: Bassi Bobby Bars Grips: Ergon GFR1 Seatpost: Raceface Aeffect dropper post Dropper post remote: Paul Components Dropper Lever Saddle: Brooks Cambium C17 Carved Seatpost clamp: DKG Pedals: MKS Pretzel Shifter & rear derailleur: MicroSHIFT XCD Cassette: Microshift 11-speed, 11-46t Chain: KMC X11 Crank: RaceFace Turbine, 175mm arms (gasp!) Chainring: Stridsland 94BCD, 32t Chainring bolts: Stridsland Bottom bracket: Shimano BB-UN300, 73mm Brakes: Paul Klampers Brake levers: Paul Love Lever Rotors: Jagwire LR2 Hubs: Hope Pro4 Rims: Stan’s Flow MK4 Spokes: Sapim Race butted Front tire: Teravail Ehline 29x2.35” Rear tire: Teravail Rutland 29x2.2” Valve stems: Discord tubeless valves Cages: Widefoot Cargo Cages, King Cage titanium bottle cage, Velo Orange Mojave cage Photo by Peter That's it! Go ride bikes with your pals somewhere pretty and where the food's real good!Shoot us an email or swing by the shop if you’re keen on the Coyote!
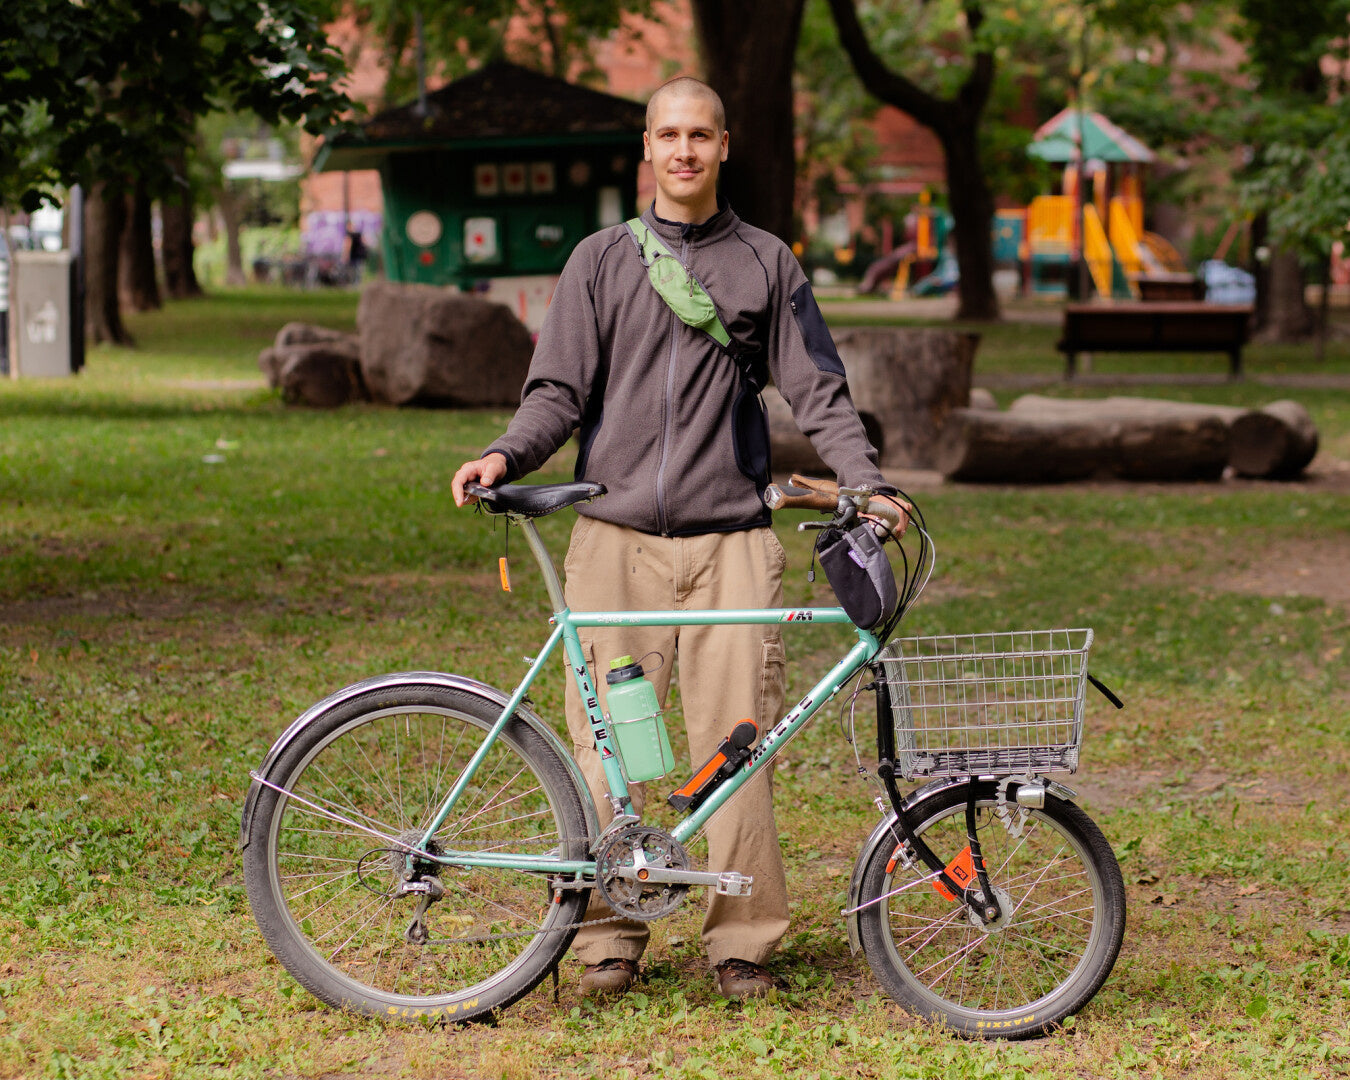
Zach's Slo-mo-cargo
Here's my do-it-all (-slowly) bike. In my view, it's the perfect utility bike. With fenders, a dynamo hub and light, and of course a cargo fork, the possibilities are endless! The only thing missing is a kickstand, but unfortunately the rear brake just won't have it. I chose to keep many of the original components for their simplicity, and because I think they're really beautiful (friction shifting, rim brakes, etc.). The components are a special grey/blue colour, which I've rarely seen on similar parts. The hardest original component to keep was the front brake, because this cargo fork isn't made for a cantilever caliper. The fork is definitely my favourite part of the bike and is inspired by my friend Marcel's GT, love at first sight (the bike and the person <3). Even though my massive front basket isn't always full, I love the potential it has.The streets of Montreal are overflowing with treasure people have discarded, and riding this bike I can always impulsively pick things up, like a whole other bike or a friend in need of a lift. My impulsiveness is also satisfied when I decide to leave on a whim for a weekend bike camp. I just have to fill my biggest bag with all the food and gear I'll need and hit the road. Once I get where I'm going, I regret not having organized my stuff, but the fresh air and a campfire make me forget that all pretty quickly. Since I ride it almost every day, and I knew it would never be the fastest bike, I wanted it to be the epitome of comfort. I put the widest non-sprung Brooks saddle (B68), ergonomic grips (Ergon GC1) and a very large, but swept-back and comfy handlebar that gets me nice and upright (Moth Bar, MagicComponents). Winter is the only time I'm not riding it. I'm therefore writing this while watching the snow melt (and fall back down again), with impatience for riding it again in the streets of Montreal and the dirt paths leading to a few nights in the outdoors. Pics by Troy

Updating the Montréal
When Bassi designed the very first version of Le Montréal in 2013, it was already a departure from what we were comfortable with — it wasn’t a classic straight track frame, and it wasn’t an Italian racing bike. It was shaped like a road bike, had thin tubing and a nimble geometry, but had room for 700 x 35mm tires (and you could just about squeeze in a fender if you were creative) and rack eyelets front and rear. It was common to call that a cyclocross bike in those days, but we didn’t know that many cyclocross racers. What it was actually meant to be like was the old bikes we repaired, rebuilt, modified and upgraded every week at our shop on Villeneuve St. Every Montréal V1 from 2013 took 700C wheels. It would have been unthinkable then to produce a run of frames with smaller wheels for the smaller sizes, and in any case good luck finding 650B rims and tires locally. The tight road bike geometry meant that on the smaller sizes around 50cm, the front wheel was really close to your feet, causing toe overlap – turning the wheel sharply while your foot was in the forward position had them occupying the same space, followed by you occupying the ground if you were clipped in. Because you don't turn the handlebars much except in a very slow-speed (or stopped) turn it's not what you'd call dangerous. Nonetheless, the Montréal changed the kinds of bicycles we felt Bassi could make, and its classic lines still perfectly fit what Montréalers expect from their everyday ride: understated beauty and a style that matches the city. Plus you could really load it with groceries and put your kid’s seat on the back, and those super-wide (for the time) tires were way safer around the potholes. It was a successful frame, and led to some variants: the Villeneuve and the Rachel were also well-received and were based on other things the Montréal could do with some tweaks, and we were ready to make a new run in 2017, but this time we’d try something different: the smallest size (49.5cm) would have 650C wheels. This wheel size standard (with a 5cm smaller diameter) was more familiar for road bike people, being common for Terry bikes and other racing bikes for shorter athletes. This eliminated toe overlap, but the 52cm frame still had some with its 700C wheels, especially with fenders. That was my bicycle: Le Montréal V2 52.5cm. I didn’t mind the toe overlap and it became second nature to work around it when riding. I’d chosen a smaller frame than I usually would, since it had very long reach: a necessary design compromise to use large 700C wheels on a small-ish frame with road bike geometry. This worked well with some setups and less with others, and eventually I began thinking of sizing up so that the handlebars would be closer and higher, and the seatpost not as embarrassingly extended. The Montréal V3 was a significant redesign. By 2020, we were ready to go all-in on the different wheel sizes, and felt confident we could supply it with wheels and tires. Doing so would also allow us to expand the size range to fit more riders comfortably. This redesign went to six frame sizes, with three wheel sizes, and our overlap problem was gone completely. This year, I felt it was time and I was ready to switch to a 55cm frame (I’m 5’11” with a PBH of 86cm for comparison’s sake). I’d need to build myself some 650B wheels, since I’d never owned any, only 700C which is a-ok on most bikes for a taller person, and 20-inch on my minivelos. I wound up trading my old frame and wheels to my friend for some art and their own old wheels they weren’t using any more, so the hubs and half the spokes on this bike had already toured the world! The rims are new Zac-19s, the original 650B rim from when Rivendell reintroduced the wheel size in the oughts. We had some on-hand with the right drilling. I of course needed to replace the fenders, since these tires are wider and the diameter is smaller. My old Honjos with their beautiful scratched-up greying non-anodized aluminium went with my old wheels, and I’m burdened by shiny new fenders (for a few years until they also develop their patina and beausage). You’ll see in the photos that the rear is installed very badly, but you can only see it from that angle, which I never do. Honjo fenders take several hours to install perfectly, but happily if you’re accepting of a merely very good installation, you can knock em out in 1h30. Everything else is the parts from my old bike. They all, of course, fit on the first try without needing adjustment. I didn’t even redo any housing! For more info check out the original blog post about this bike. Incidentally, this has turned out to be a great airplane bike. We’ll be exploring and explaining that concept more this year, but when flying somewhere to ride there, it helps to have a sturdy and simple bike that’s really straightforward to disassemble as small as possible. Downtube shifters are huge for that, non-æro brake levers help a lot as do cantilever brakes, and my silly idea of having a quick-swappable cockpit has been very helpful. The racks also all come apart very quickly. The only bit that takes any time is removing the fenders and once the wheels are off, it’s not that hard. They get tied to the wheels for packing, of course. Long Allen keys like those from Wera really help, it’s a little trickier with a multitool. The correct size frame is a lot more comfortable to ride, especially on long distances, and the lack of toe overlap was an astonishing relief! I’d become used to working around the wheel position on the other frame, but now I never have to even consider it, even with wide 42mm tires and big fenders. This do-everything bike is the one I walk out the door with when I don’t have a pressing reason to take another: the racks go on and off quickly so I can use it for cat food and litter errands, it’s got a dynamo so I don’t have to worry about sunset, and the sorta-wide 42mm tires are just as nice on fresh clean asphalt as they are on rocks and dirt. I’ve taken it on last-minute bike tours since it’s so simple to pack for flying, and it’s the last bike to be put away for winter, as well as the first to come back out in the Spring. I also love how it looks, though that’s true of all my bikes! Way more pictures below for you to see — don't forget to open them in a new tab to embiggen! Photos, as ever when they're this good, by Troy.
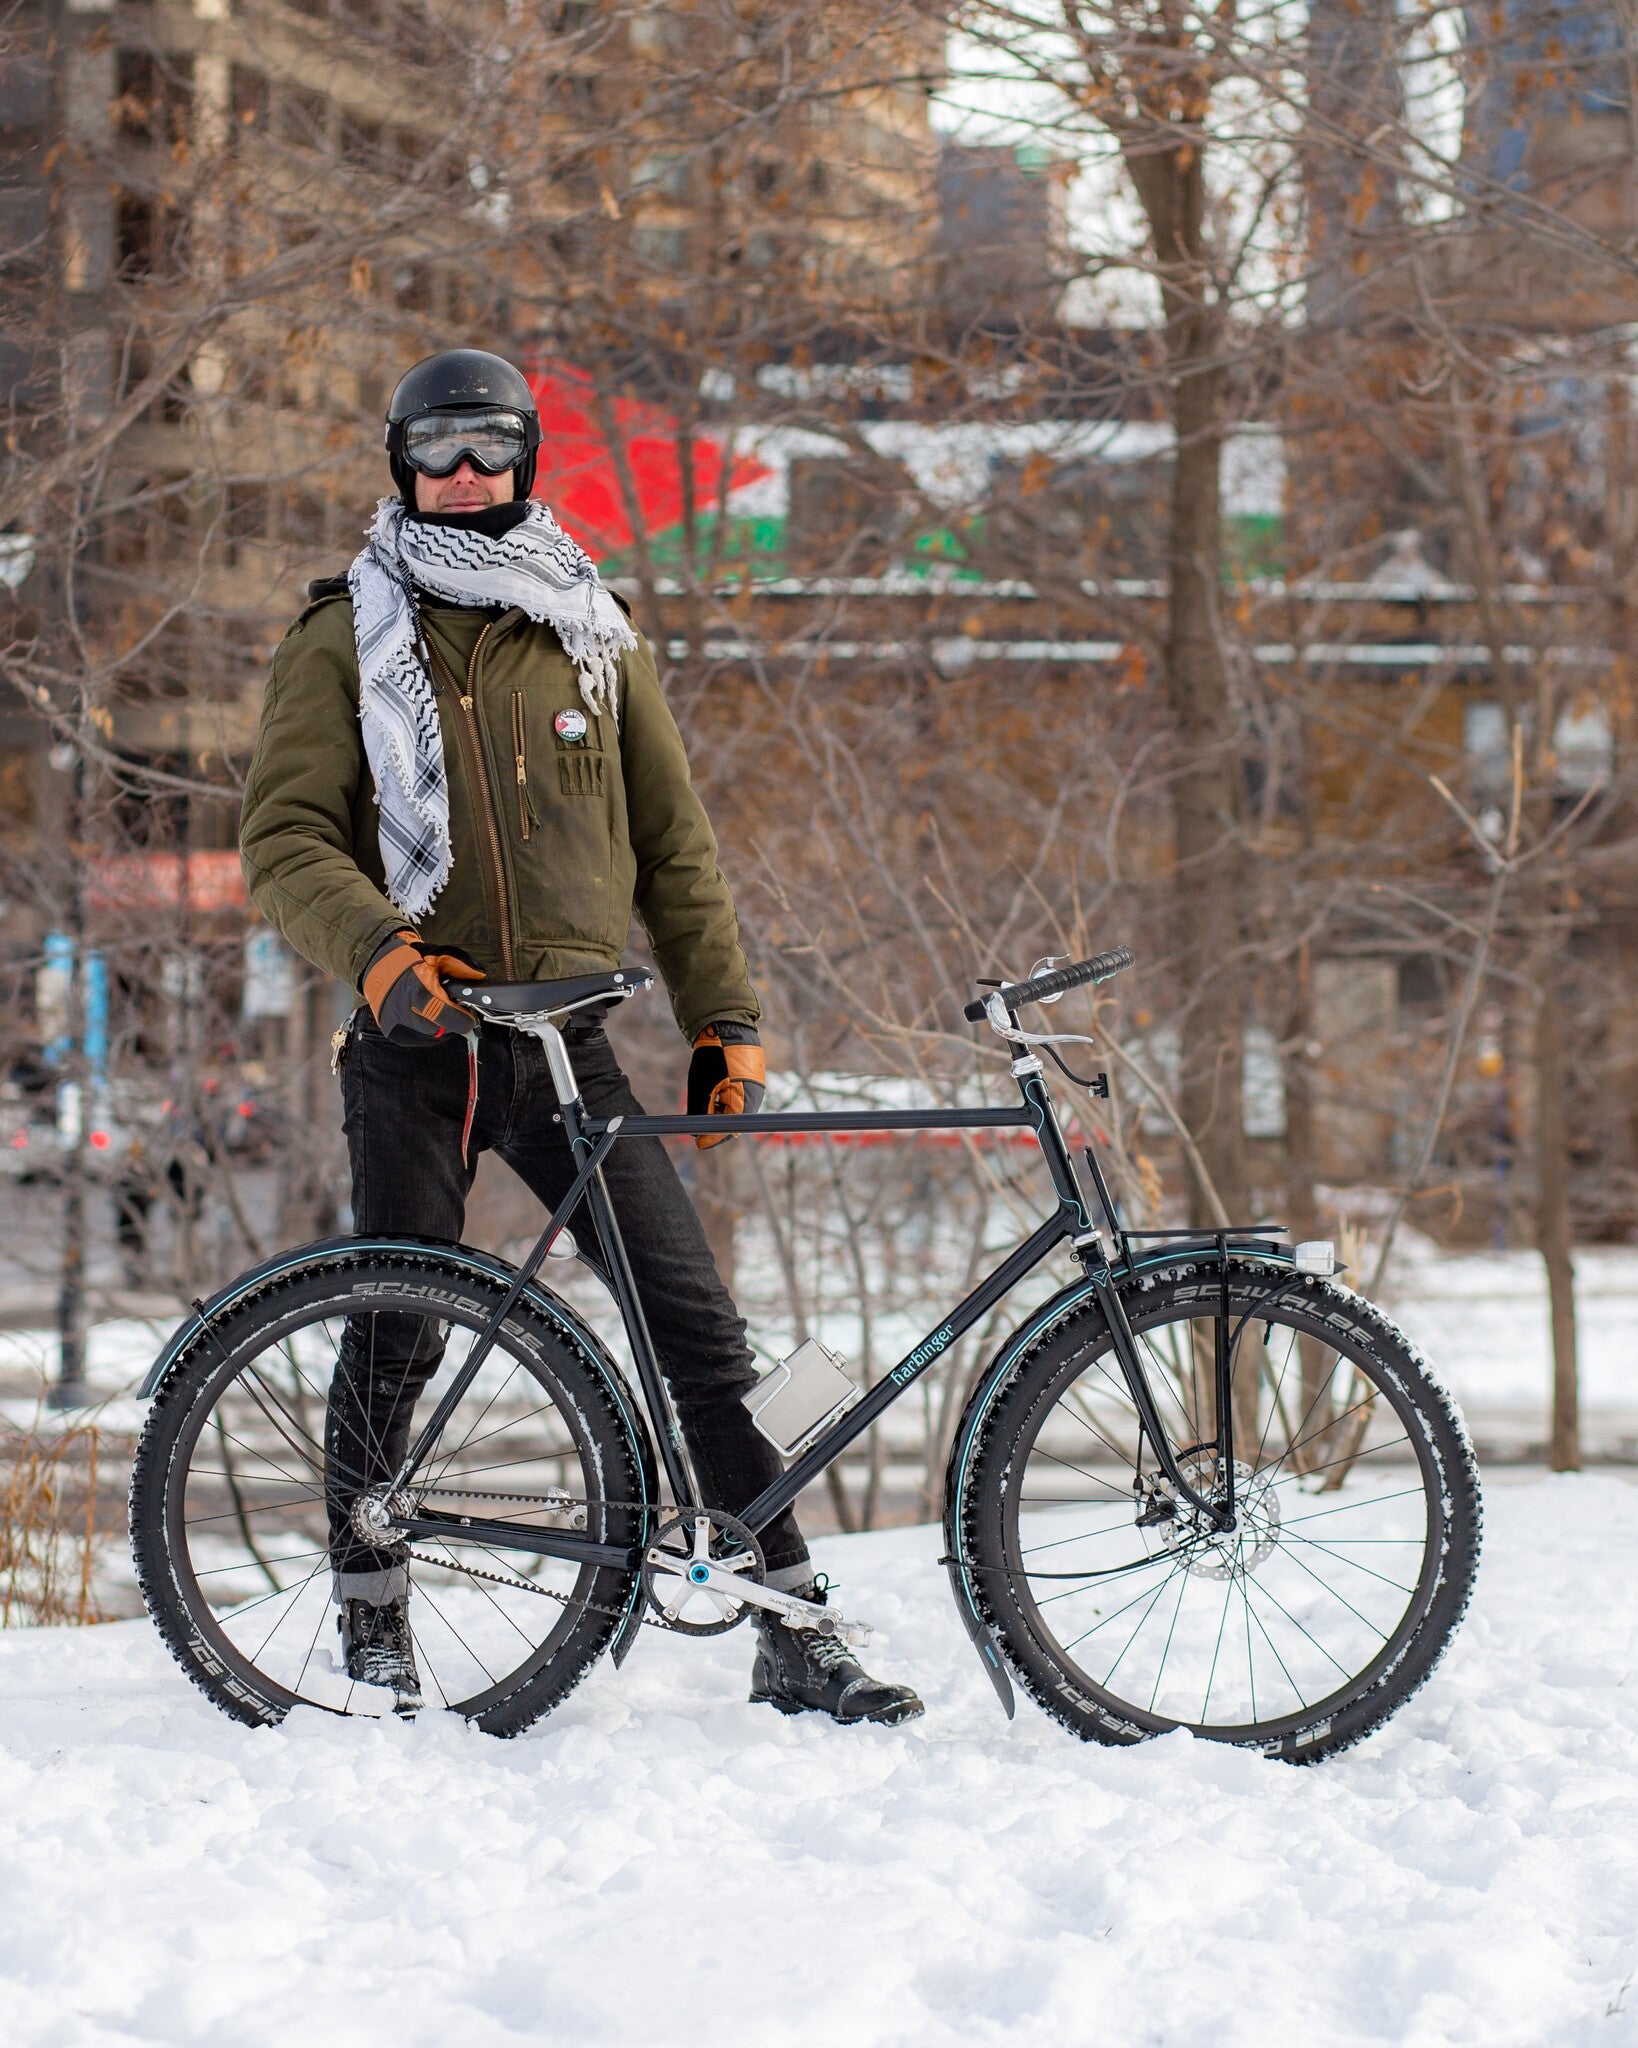
Bill's Winter Harbinger
Editor's note, because I was curious and figured you would be too: Bill tells me he estimates this bike took at least 400 hours to build. You can really see it! Before I had even finished building my first frame, I knew I was hooked. I spent a lot of time considering my second: a frame that could handle a real Tiohtià:ke winter. First, a few words about that. It's hard to say this without sounding condescending, so here goes; the concept of winter cycling, as it is often expressed in blogs and articles, portrays a version of winter that is, well... quaint. Do you live in the pacific northwest, or the US east coast, and maybe it gets extra rainy for a few months? It will even snow an inch or two a couple of times? Better put some fenders on that road bike, maybe even bump the tires up to 28mm! How cute. There's rarely talk of snowbanks piled higher than your head, or roads covered in salt that will eat your chain every few months or so. Not to fall into the machismo of bragging about a northern winter, but it must be said: if you've never felt your snot freeze inside your nose, then we're not talking about the same thing. Of course, there are places colder than my city, and the catastrophe of climate change means that even here we experience more winter thaws than ever. But I would say that makes the choice of a winter bike here even more challenging. There are places so cold that there's no point in salting the roads. Sure, the temperatures are lower, but the conditions are stable and predictable. Here, on the other hand, the salt on the roads lowers the melting point of snow and ice so that the winter roads are almost perpetually wet. A familiar soup of salty slush will spray your bike at all times, sticking to it and corroding your parts. The freshly thawed water will seep into your cables and housing, only to freeze again moments later and seize your brakes. As the temperature continues to drop, eventually even the salt won't stop water from freezing. And now all that previously thawed water that covered the roads becomes a skating rink, albeit with tire ruts throughout. Then maybe it snows again, so you'll have a nice layer of soft snow that easily slides over the ice beneath. As the temperature rises, the snow becomes wet hard pack that fills the space between your fenders and tires, bogging you down. So what's the ideal bike for these conditions? As you can imagine, this is a topic of some debate. Some say it's best to have skinny tires pumped to high pressure, to slice through the deep snow. Some people ride fat bikes. Luckily, all these options and everything in between are available to us, so we can pursue what we like, rather than worry about who's right. In that spirit, I humbly offer what I thought was needed for a suitable winter bike: Cables and moving parts should be kept to a minimum. They just introduce the possibility of failure, and you'll have to replace them regularly. Instead, save yourself the trouble and expense by keeping it simple. If you must have gears, internal gears are preferable to derailleurs, as the moving parts are relatively sealed from the elements. Fenders are a must. Full coverage is nice, but not strictly necessary. Most likely you'll be wearing boots anyway, so a simple rear fender to keep the spray off your body will do. No need for anything fancy. For tires, knobbies are an absolute must, and after switching to studded tires years ago, I'll never go back. Yes, they are slower, but with the added stability you can try to go as fast as you can. Usually, that's faster than you'd go without them. The bike must be a real piece of junk. I mean total crap. Nice bikes with nice parts will only be rusted or destroyed after a season or two. Liberate yourself from the heartache by riding a beater for your winter bike. This criteria led me to an old 90's department store mountain bike with horizontal dropouts that built up easily as a fixed gear. It served me well for over a decade. But I couldn't help but wonder if a nice winter bike could be justified, if it's well thought out. What if I brazed all the vent holes in the frame shut, to limit moisture from getting inside the steel tubes? What if the other frame attachments were blind bosses, so they also don't create openings to the inside of the frame? What if I chose all the components based on the specs above, and built the frame around them? I also wanted to try some things that I'd seen done by my favourite frame builders. If I acknowledge it, it's a homage rather than just copying, right? I'll try to mention specific things throughout, but to understand the general look I was going for, you should check out a bike called the Discville built by Mitch Pryor. This bike was burned into my mind, and the elegant combination of modern parts with a classic aesthetic became my inspiration here. This was also a chance for me to experiment with new things, both in terms of fabrication and components. Some of these experiments were more successful than others, as you'll see. So to start with, I chose to go with a Gates carbon belt drive. The belt can't rust, doesn't require lube, and lasts much longer than a chain under any conditions. So it's a great choice for a winter bike. The usual drawback is that you need a frame specially made or modified, with a split in the rear triangle to be able to install the belt. No problem here! As a side note, not all of the Gates belts are rated for low temperatures, so if you're planning a winter bike, make sure you get one that is! Many people miss the discreet split built into the chainstay. This is a design that I copied from Rob English of English Cycles. The clamp is socketed, so the connection is very solid. A single M6 bolt, hidden in hooded dropout, holds it all together. I chose an eccentric bottom bracket to be able to tension the belt. The belt won't stretch with wear the way a chain does, so I don't need a lot of adjustment here. For that reason I went with a smaller PF30 bottom bracket. As a bonus, I got to see the amused looks on people's faces when I told them I was building a frame with this otherwise obsolete standard. I also carved these faux lugs for the bottom bracket shell. This was mostly for fun, and I enjoyed carving the various lugs to match throughout the frame. These three dots on the BB shell and seat cluster are also an aesthetic homage to Rob English, as you'll see his influence elsewhere on the bike as well. The rear hub is the ultra reliable Sturmey 3 speed internal gear hub, with a coaster brake. This fits the build spec, as it eliminates the need for a rear brake cable, and keeps the gearing mechanism relatively protected from the elements. It's also necessary with the belt drive, which is incompatible with external derailleurs. Because the belt is tensioned at the BB, the hub axle and therefore the coaster brake arm is stationary. That meant I could install the brake arm in a dedicated braze on for a sleeker look. Although it theoretically exists in other drillings, I was unable to find this hub for anything other than 36 spokes. I'm not a heavy guy, and I wanted this to be a light, zippy bike. So 36 spokes just felt like overkill. I found a solution on an internet forum: a lacing pattern for a 24 spoke rim to a 36 spoke hub! As you can see here, this is achieved by skipping spoke holes in the hub. This means that the tangent of the leading and trailing spokes is not the same. To compensate, there are two different spoke lengths on the same side of the wheel! Like this, the wheel builds up with even tension throughout. This was a fun and challenging wheel build, and I'm really happy with the results. Continuing down the drivetrain, I've joined Julian's Rachel as part of this new genre of bikes: Sturmey 3 speeds with Dura-Ace cranks. This one came from my parts bin and has 177.5 mm arm length, how cool! The carbon belt requires a wider chainring than normal. That, combined with the narrow chainline of the Sturmey hub, the wide tires, and the desired chainstay length, means that clearance is pretty tight. So a chainstay yoke was the best solution. I made this one myself out of a big chunk of 4130 steel. Very heavy but also very stiff! I'm pretty happy with how my finishing work on this turned out. Moving up the frame, we'll find some more weirdness. Many people are confused when they see the stem, and wonder how it is fixed to the fork. The easiest way to explain it is that it's a normal threadless headset system, but upside down! Usually the fork and the steerer tube are one piece, and the stem clamps to the top of the steerer. Here, the stem and steerer tube are both a single piece, and the fork clamps to the bottom of the steerer, with a "top" cap under the fork crown to add preload to the headset. What's the advantage of this system? None that I'm aware of. But I thought it looked cool and wanted to try it! I also like the clean look of a quill stem that it makes possible, adding to the classic aesthetic I was going for. This is another inspiration from Rob English, who I first saw build a fork like this. But there's more! I also made the handlebar, which is brazed directly to the stem. Once again, no real advantage here other than the fun of doing it, and the aesthetic. I tried to recreate the point on the stem that I first saw on a custom stem made by Erik Estlund from Winter Bicycles. But wait, it gets even weirder! So for the front brake, I had to put aside my usual grumpiness and admit that a disc brake was the best option. Rim brakes suffer in the wet, and the salt and sludge will absolutely eat even the best alloy rims. The performance of hydraulics can also suffer in extreme cold. So mechanical it was. This also meant I could use this CLB lever, just like the Discville dream bike. I liked that the lever's cable was internal to the bar, because it meant that one of the housing openings would be completely hidden from the elements (remember the build spec!). This got me to thinking, how internal could I make it? The handlebar, stem, and steerer were already one piece, it wouldn't be too complicated to run a brass tube inside as a cable guide... could I connect it from there to the fork crown and blade? This is what I attempted, to make the brake cable not just internal, but Really Fucking Internal™. Again, this was one of my experiments, just for fun, but maybe one of the less successful ones. There are many right angles here, some very close to each other, especially the successive turns from the steerer to the fork crown, to the fork blade. It creates a lot of friction and drag on the cable. You can see this little spring I added to the brake caliper, to try to compensate. It works ok, and adding a plastic sleeve to the internal guide tubes helped a lot. It's now a very functional brake, which is the nicest way to put it, but the process to replace a cable is super tedious, requiring the disassembly of the fork. I don't think I would do this again, but I'm glad I tried, and I really like the sleek look it gives the bike. I liked the look of a classic fork crown, and oval fork blades, and I didn't trust my ability to fabricate any other kind of fork. At the same time, I knew that these blades would be too light to resist the twisting forces from the disc brake. My solution to this was to build a truss to create triangulation. That's the real purpose of the front rack’s legs. Once the truss structure was complete, I figured why not put a platform on top and use it as a rack? Someone commented that this rack reminds them of Joseph Ahearne's work, and I must have been channeling images I'd seen of his rack building process when I made this. From there I decided to take it a step further and make a custom decaleur, brazed directly to the steerer/stem, so I can use my beloved Acorn Rando bag. Lights on a winter bike are really important, especially as it gets dark earlier and earlier. Of course I wanted a dynamo hub. For the wiring, I tried to follow the same concept as the brake cable. All the wiring is hidden inside the tubes of the bike, with brass internal guides throughout so there are no openings to the more rust-vulnerable steel. I didn't want the more common wire hole in the down tube, both to avoid a hole for moisture to enter the tube, and also to maintain the sleek look. Instead, there's a spring loaded connector inside the downtube/headtube junction that contacts an isolated brass tube on the steerer. I fabricated this myself from random bits from the hardware store, just a couple of months before René Herse released a very similar ready made kit. Sigh. My setup is actually more complicated though, because of the whole upside down headset situation. So there's also a spring loaded connector in the fork crown, that contacts a fixed point on the steerer, which connects to a wire that passes through a very small hole in the steerer, to contact the aforementioned brass tube. Phew! Maybe overly complicated, and the truth is that it does not work very well. I've already done a couple of painstaking disassemblies to rewire the rear light, only to have it fail again. Probably another failed experiment, but I haven't given up yet! By this point, I was in love with the clean look of the handlebars, and didn't want to put anything else on them. So both the bell and shifter got dedicated mounts brazed to the stem. Using a downtube shifter makes this possible, and is also easier to operate with mittens. The shifter cable is also Really Fucking Internal™. The Jo Routens-style seatstays are pretty, but also facilitate the shifter cable passing directly from the inside of the top tube, to inside the seatstay, to exit just above the hub. This was much more successful than the brake cable routing, probably owing to the relative simplicity, and the forgiving adjustment of the Sturmey 3 speed system. Another experiment on this bike, for me at least, are the carbon rims. I've been curious about carbon rims for some time. But I hate the feel of carbon as a braking surface, not to mention that using carbon rims with rim brakes also makes them a disposable part, as all rims with rim brakes ultimately are. I find them a bit expensive for that. And unlike an alloy rim, a carbon rim will surely just sit in a landfill once it reaches that point. But finally I was building a bike with no need for a braking surface on the rim. This was my chance! They are also a nice choice to pair with the 24 spoke lacing pattern, as the conventional wisdom is that stiffer carbon rims require fewer spokes. So far so good, but we'll have to see how they hold up in the long term. The tires are Schwalbe's Ice Spiker Pro, my favourite winter tire. Some will say that this tire is overkill for city riding. Yes, I agree! Absolute overkill! I love it. These are also the surprisingly hard to find variant with their Evo Liteskin. It's the folding version of the Ice Spiker, the only supple winter tire that I know of. I'm running these tubeless, another winter experiment for me! So far I am enjoying the low pressure and cushy ride. The frame tubing is René Herse Kasei tubing throughout, with the exception of beefier Columbus mountain S-bend chain stays, and generic 4130 straight gauge tubing for the steerer, stem, handlebar and rack. Once again, I chose powder coating as the finish for its durability. I decided on "harbinger" as a name, again just for fun. The folks at Magnus Coating were able to do the lettering in powder as well, which I think is really impressive! I did the lining on the lugs and fenders myself, another first time experience for me. I just followed along with Brian Chapman's Instagram as if it were an instructional video. Mine didn't turn out nearly as clean as his, but not bad for a first try! Just like my last frame, this one also has a decal on the seat tube to acknowledge where it was made: the unceded territory of the Kanien'kehá:ka people. This bike is also repping a Palestine themed rear reflector from Bikecrud, which feels sadly crucial after over a year of genocide in Gaza and increasing violence in the West Bank. For those who might not know, the watermelon became a well known Palestinian symbol after the occupation banned not only the Palestine flag, but also any artwork that featured the flag's colours. Palestinian artist Issam Badrl was famously told by occupation authorities that if he painted a watermelon, it would be confiscated. Since then, the locally grown melon became a symbol of the Palestinian people's steadfast resistance to their colonizers. In the end, I'm really happy with how this bike turned out. So happy, that I've decided to use it as my four season commuter. In the spring it gets slick tires and continues its daily duties. This was only my second frame, and it was really fun to challenge myself and try new things. This is my first winter riding it, so ask me again in a year how successful I was... Photos by Troy
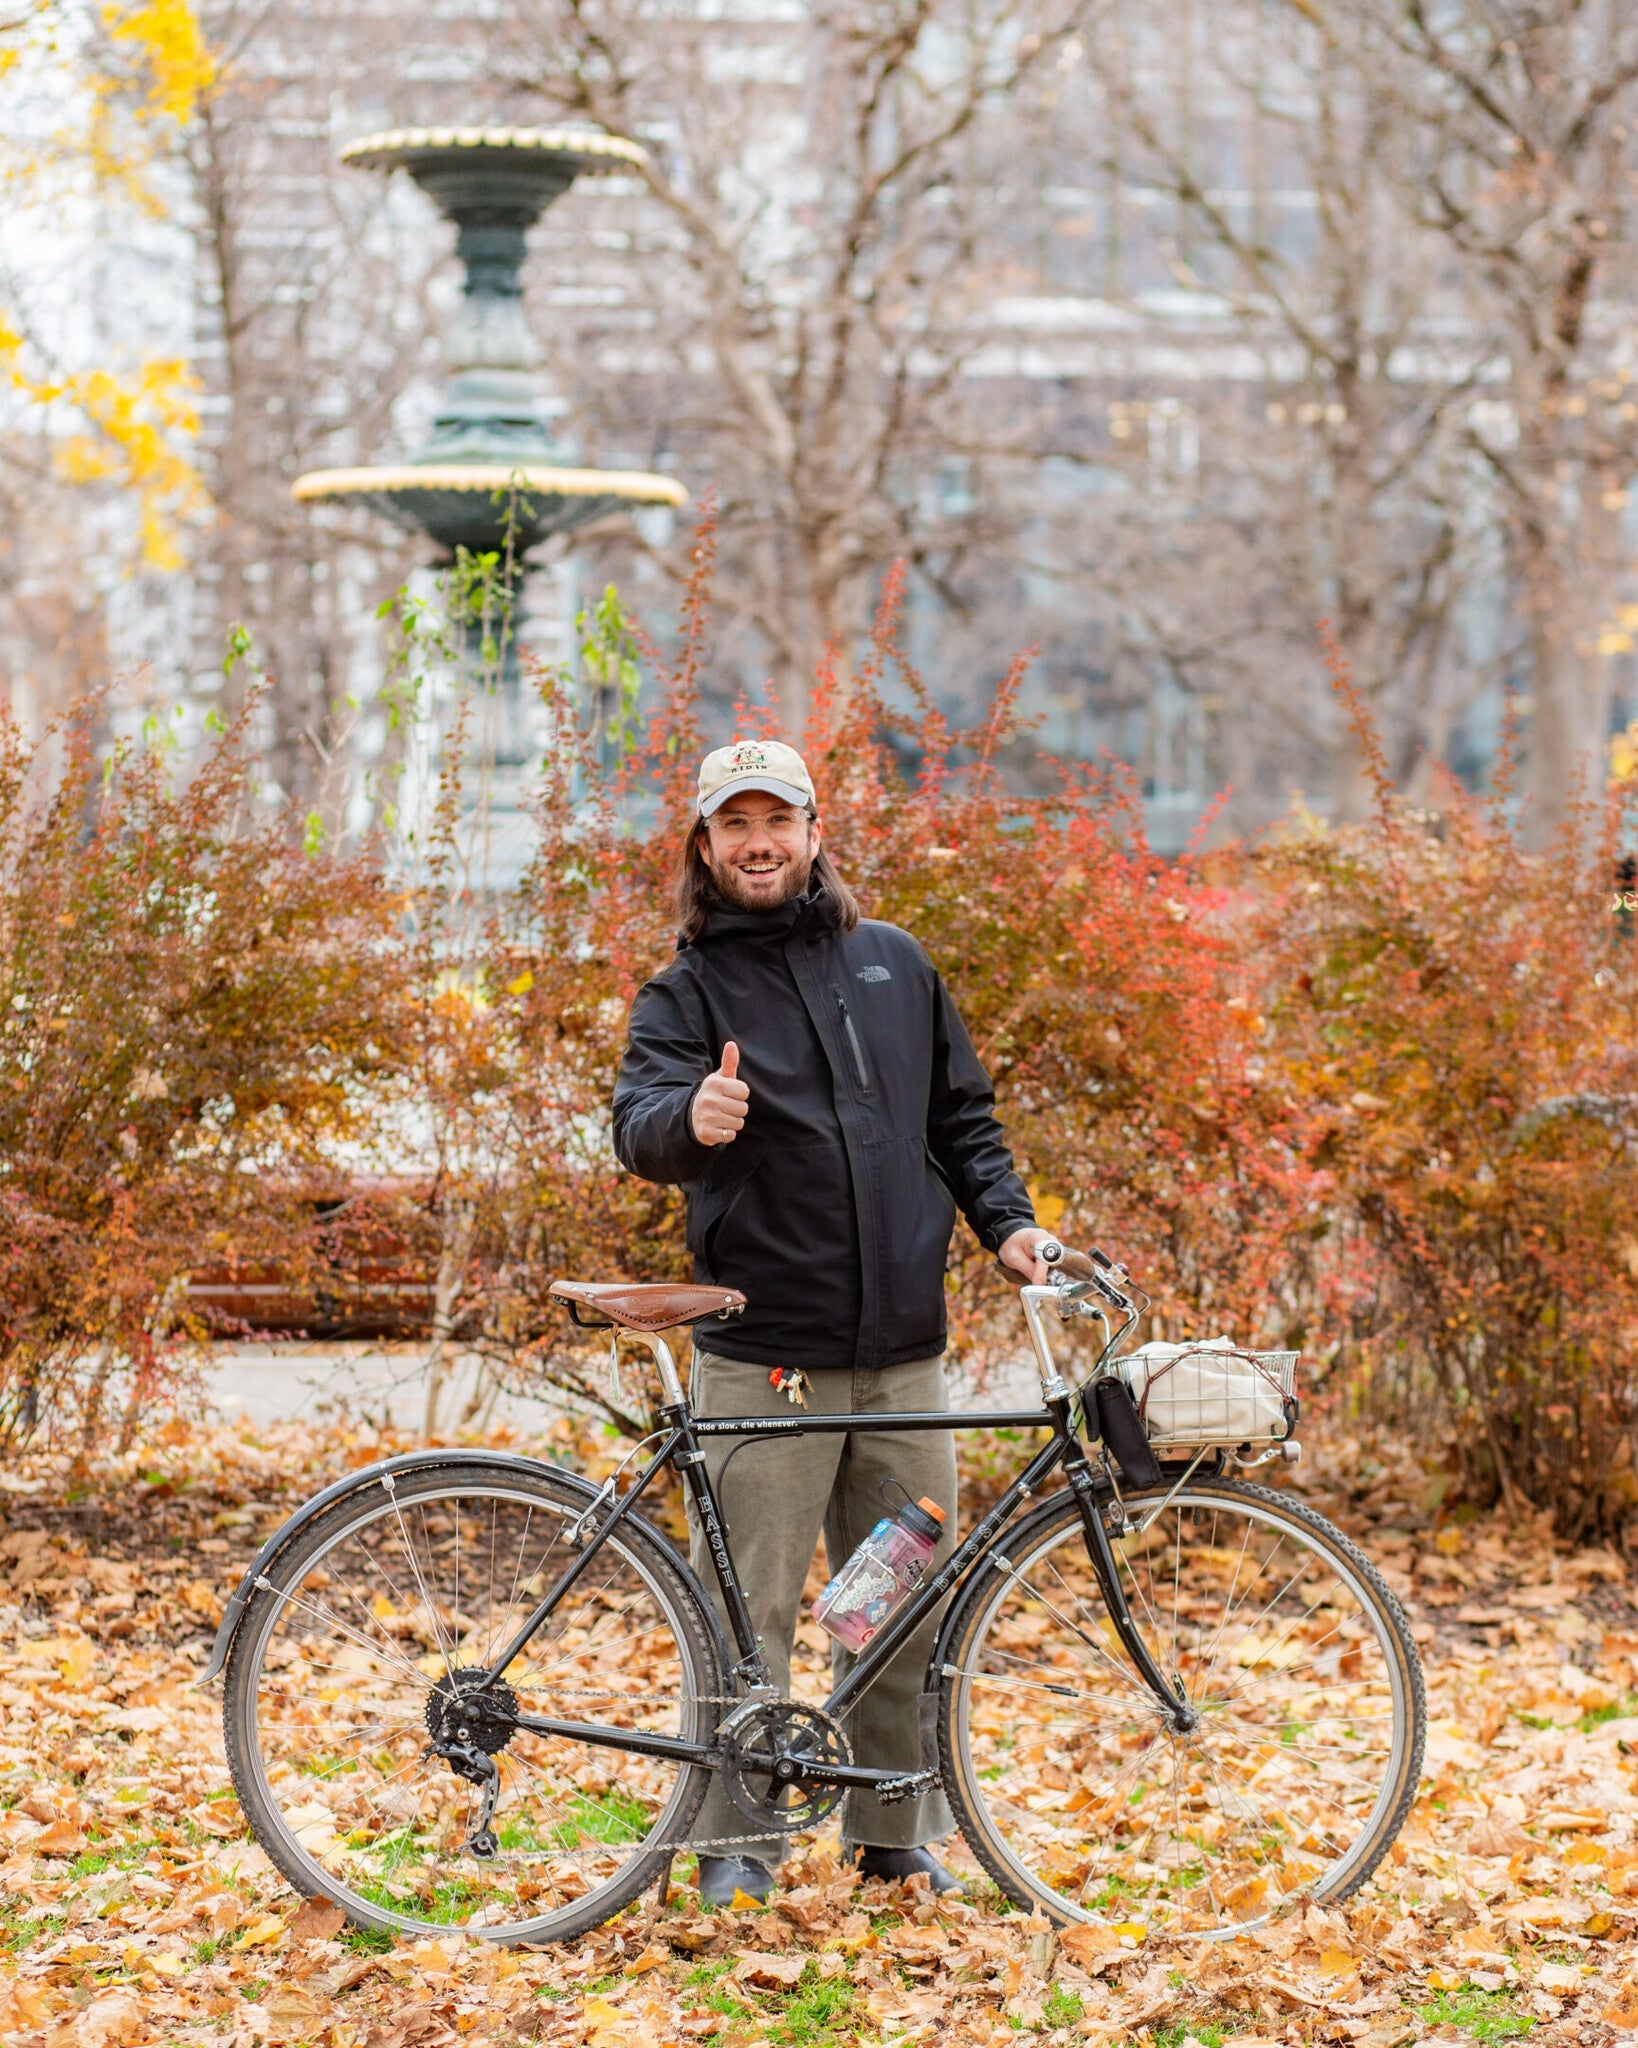
Sam and his Bassi Le Montreal (V2)
After years riding a fixed gear bike I felt like slowing the pace a bit. My 30th birthday was waving at me from afar and I was feeling more and more like cruising down the Berri hill. My knees still thank me. So a city bike was looking like a great alternative and at the time, even before being part of C&L staff, there was a sale for that version of the Bassi Montreal. The stars were aligned. Back then, my bike knowledge could be measured in “ratio-to-skid patch” and with how many Thickslicks I could go through in a year. I had not yet met the Nitto, Blue Lug, Rivendell, Sim Works and René Herse of this world. It wouldn’t be long. The stock build being slick and solid was totally gonna suit my needs. Anyways, I was so eager to ride like a grandpa. Which I still do and showing it off with that Stridsland decal. I eventually swapped almost all the stock parts. Only the crank, the front derailleur, and the wheels remain from the original spec (for now). As you can see, I have rapidly been influenced by the companies mentioned above and their instagram accounts. To my defence I also explored different setups to maximize my comfort and my pleasure. Because, let’s be honest, without comfort and fun I might as well ride a Bixi. So this version of my Montreal is the most optimal version to this day to fill this quest. My favourite add-ons are probably the Sai Flower Blue Lug’s triangle reflector and the Nitto lamp holder no.7. Good gift ideas in my opinion. They have no impact on my comfort but they sure do look good on any bike! With winter still going strong, I'll sadly have to leave this bike hanging in my home office for a little while. Cute wall art I think. We might see it again when the snow and salt will make way for clean roads and crowded parks once again.

Tyler's Bassi Le Montreal
Let me preface this with saying that bike fit is a huge PITA for me. I have the legs and arms of someone about 6'2" (91.5cm inseam!), the torso of someone 6 inches shorter, and the spinal flexibility of a dry noodle. With all this in mind, the super tall stack, short stem and setback seatpost were essential to getting my fit just right. My coworkers all joke that I'm basically riding a flatbar bike at this point and I suppose they wouldn't be too far off the mark, though this is currently the most aggressive/zippy bike I have. My other builds (Piolet and Hog's Back) are set up with chunky tires and the sweepiest of alt bars, so dabbling in drop bars has been a fun change. I was pretty curious about the Microshift Sword groupset and decided to give it a try. I've dubbed the build "Grandonneur" as it takes some inspiration from Rando builds but with a 10x2 gravel groupset that has a decent enough high and low end without too many big jumps on the 11-38 cassette. It's all pretty modern looking, though I did throw some sweet Dia Compe cantis on to help keep some of the classic lugged frame charm. A wide-ish Nitto Dirt Drop handlebar and 42mm Cava Robusto tires lend the bike a little more offroad capability without taking away from it's zippyness on pavement. The wheels are built up on 700c Archetype rims, a Bassi touring rear hub, and like all my bikes, a dynamo hub up front. I love never worrying about charging lights and if I decide to stay out late on a ride I know I'm good to go on the way home. For now the bike is rack-less and (almost) fenderless, a conscious decision to keep weight down even if it does mean I'm a little grubby on my return home. I have plans to sew up a couple bags to keep all the essentials I need when out for longer rides, a project for the winter season while the bike awaits the spring melt. Photos by Troy

Bloomfield Winter Whip
Since today was my first commute in the snow this season (a light snow but still snow on the ground!) I figured it was the right time to show you a different look that my Bloomfield takes on for riding out the long, sometimes difficult winters in Montréal. The summer build is unchanged, but the flexibility of the Bloomfield means it's pretty easy to swap parts for different seasons. For context, the winter conditions in Montréal are, outside of some outlier days, between 0°C and -15°C, ignoring wind chill since you've always got some extra wind on a bike. Precipitation is mostly snow, with some freezing rain days. Road conditions vary between: dry but filthy and salty; slushy; loose snow; packed snow; and black ice (sometimes with bonus snow on top). Bike paths are mostly well-cleared these days, particularly the REV arterials, but local streets are often treacherous and motorists extremely vicious, moreso than in Spring and Summer. The Sun tends to be up when I go to work, but sets well before the end of the workday, so a strong light is a must. On to the parts swaps! The big difference is the wheel size. The Bloomfield V1 was designed from the start to be able to use larger 700C wheels (narrow tire summer styles) or the smaller 650B size (wider tire and room in the frame for fenders). Going from a 700 x 32C slick tire to a studded 650 x 38B winter tire makes for a smaller total diameter and you can juuuuust about squeeze in some metal fenders. You've usually got to use different sidepull brakes for the different wheel sizes, but if you don't care too much about braking power on the front, it turns out old Mafac Racers just need to have their pads moved to the extremes of their adjustment range. OK, so that rear hub... I'm one of the reluctant Sturmey-Archer apologists at C&L, and this is the third winter bike I've built with an internally-geared hub (8-speed Sturmey and Shimano Nexus-3 if you're curious - the former is retired for being ridiculous and the latter is still going on a buddy's beater bike). The S2C is weird even by IGH standards, but when I found out I could get it in a coaster-brake, 120mm spaced version, a perverse part of my mind wouldn't let me use anything else. It's a 2-speed which is convenient around town, and shifts by moving the pedals backward a fraction of a turn. It's also got a coaster brake, which you brake by pushing backward on the pedals slightly more than to shift... Yes, that means you shift every time you brake. If you're coming to a stop from high gear, that means you'll be starting in low gear. Pretty clever stuff but very weird. I'm seeing how many winters it can survive, I opened it up and greased it to my own winter standards before initial setup. I've found that at -10°C and below, if you give the bike time to sit around and equalize to the ambient temperature, you can't shift anymore until it's moved and warmed up for a few km - but the braking still works perfectly. I normally try to steer people away from coaster brakes since most are made for light use or children, meaning they're not designed to stop a full-grown person who's really moving. This is a beefy one though, and works well enough that I don't often have to use my front brake! That's convenient since when braking on the front you have more power but lose some control, both potentially problematic on slippery surfaces. The chain is also one I only use in the winter, partly because I'd need to resize my summer chain for the larger cog, partly because my summer chain's pretty nice and I don't want it sitting in brine all season. The chain's rust-coloured because of the rust from storage - it's suspended in the chain oil and will come off when I clean it. Happily the chainline works great with the same crank and bottom bracket. Instead of drop handlebars, I've got this nice cozy and relaxed North Road-style handlebar, which I keep with its bell and stem in my storage once summer's over. It's a quick swap since my brake lever is hinged and comes off easily. These handlebars are way easier to use with big huge mittens than road bars would be. The Soma front mini-rack supports a bag, I actually leave it on for the summer now too, it's just too convenient, and Bassi forks are designed with this rack's dimensions in mind so it's the easiest one to fit. Its small size and thoughtful shapes make it look like a natural part of the bike, particularly when I remove the light for the winter. The front wheel's built with a dynamo hub. It's even more important in winter for reliability, since batteries don't keep their charge nearly as well when it's very cold. The light is the Kasai Trail Beam - being seen clearly is more important in a snow storm so a shaped beam is less useful than this one which just throws its light everywhere. Fenders are completely indispensable for winter riding, maybe even more so than the studded tires that are on this bike. There's almost always some moisture on the ground, and with road salt it becomes a brine. Having that thrown up all over me and the bike every day for months would make all the parts wear much, much faster. These are aluminium ones from Tanaka (Merry Sales), a 650 x 45B model. As you can see the fender line is awful, but with track dropouts I have to be able to move the wheel back to remove it. The front has a flap to protect my boots and bottom bracket, which I cut from leather scraps. The front fender's stays aren't cut because I didn't need to and didn't care, no other reason. The last little detail is the big ol' Blue Lug reflector on the saddle, a Peace Sports special collaboration. Isaac who runs Peace (and is like me a folder/minivelo enthusiast) is chums with Riv Bike's James and we had a little bike hang and chat when I visited San Francisco this fall. Thanks again for the reflector Isaac! Happy riding even in the dark months! Remember to always keep your stick on the ice, and have fun out there.
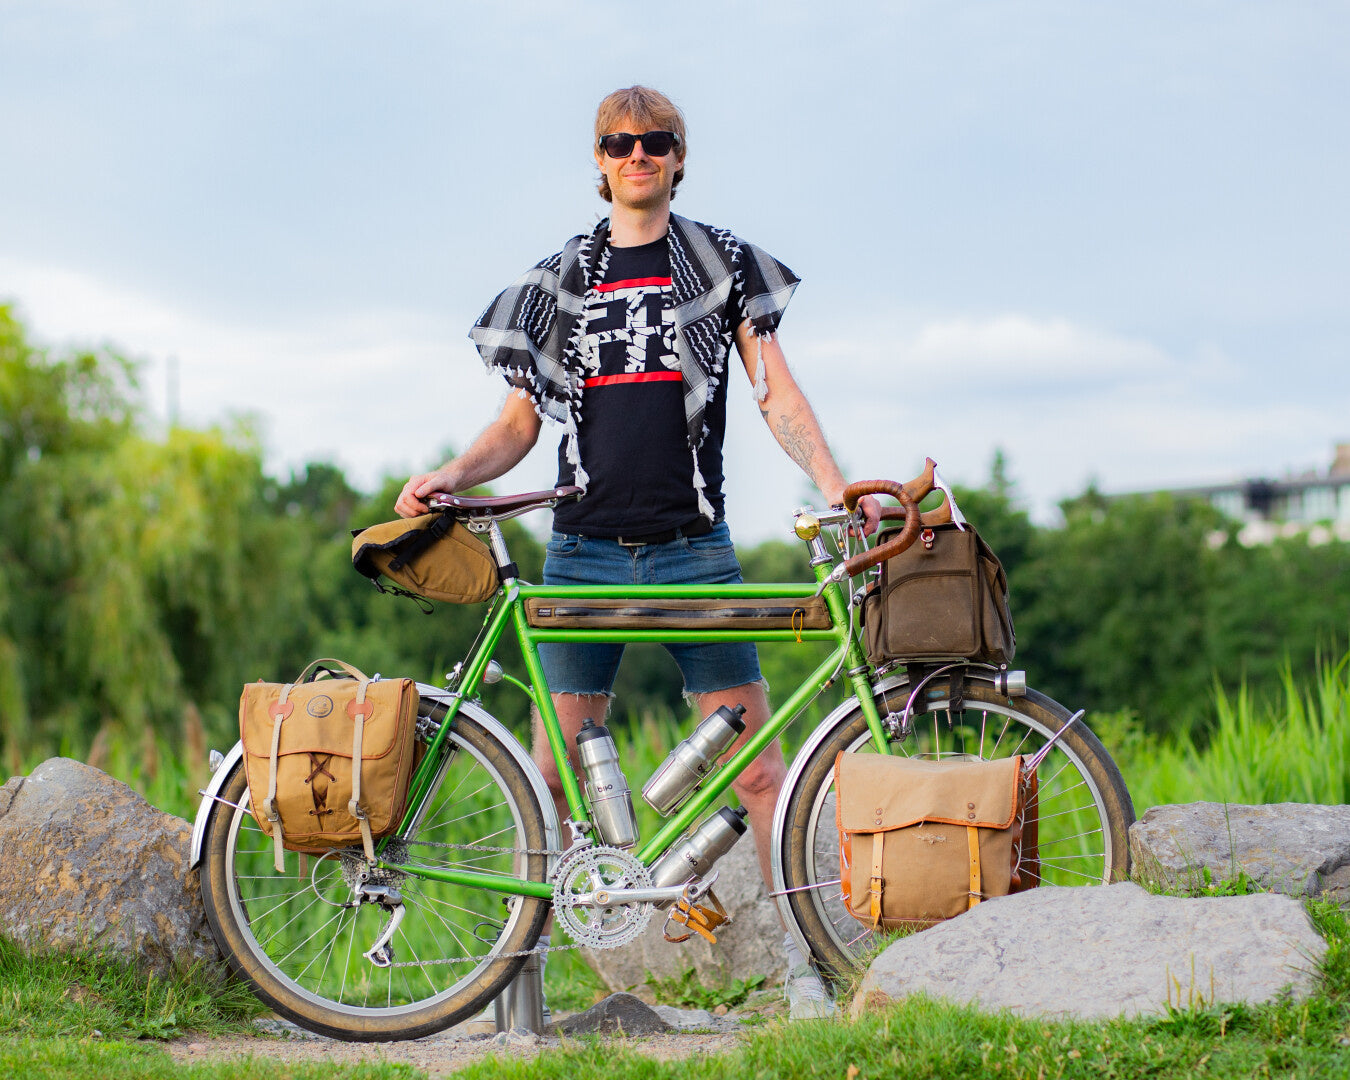
Bill's
This is my touring bike, which is also the very first frame I ever made. Building it was a big project for me that took several years. So there's a lot I could say about it, but I'll try not to go on forever! I had no fabrication experience going into it. I had never even held a torch. I started by taking a class with Jacques Gallant. Jacques is a local metal worker who's well known in the bike scene. There probably aren't too many people in the city who have built a frame without being helped by Jacques in some way or another at some point. This was before he was offering frame building classes. It was "Introduction to Brazing for Bicycle Repair". So he taught me how to braze with an oxy-acetylene torch using brass and silver (a way of using heat to join metals. It's not technically welding, and if we call it welding then actual welders will come for us in the comments). From there it was a lot of trial and error. I bought a few books and videos about framebuilding, but honestly, nothing was more helpful than Brian Chapman's instagram page. At first, I wasn't sure if this would just be a one off project. So I decided to go all out on it. After all, if I was never gonna make another frame again, I had to make sure this one was really nice, right? Eventually I got really into it. Planning all the details became really fun. It was sort of liberating that I could just do whatever I want. Rather than being limited by what the industry is pushing or what happens to be available in the used market, I was only limited by my imagination, and, you know, physics. Aside from the fabrication side of things, this project also forced me to think about frame design and geometry in ways I never had before. I wanted something stiff enough for loaded touring, while also more maneuverable than a tank. I had to think about tubing diameters and wall thicknesses, and different alloys. I had to make decisions about headtube angles and fork rake, all while trying to wrap my head around confusing concepts, like the difference between mechanical and pneumatic trail. And wheel flop! Let's talk about the build spec a bit. To my mind, a touring bike needs parts that are robust, reliable, easy to service without specialty tools, and that are widely available wherever you might end up. This was years ago, when 650b was still a niche product. And I've never really liked the monster truck feel of 29ers. 26 inch wheels, on the other hand, are probably the most universal wheel size in the world. The smaller diameter is also more durable and more agile, maintaining that "roadbike" feel. Smaller diameter also lowers the gear ratio, always helpful on a touring bike. Who cares if I'm tall? (As a side note, when I designed this bike, tires over 2 inches wide on a "road" bike was still extreme. The Rat Trap Pass tires had just come out, and if you look closely, you'll see that these are "Compass" tires, from before the René Herse rebrand). In the rear I've got the Velo Orange touring hub. I like sealed cartridge bearings on a touring bike, because if you're in a situation where you simply can't service the bearings, you can still keep rolling without damaging the hub (ditto for the bb and headset). It's really cool that the freehub, and therefore cassette, can be removed easily without any tools. This means that a broken spoke could be replaced with only a spoke wrench on the side of the road. But with 36 double butted spokes laced to Rhynolite rims (those modest workhorses), it's unlikely I'll ever break a spoke. That didn't stop me from brazing spare spoke holders onto the non drive side chainstay, just in case. The dynamo front hub powers my lights and also a usb charger for my GPS or other devices. All of the wiring is internal. This gives a cleaner look, but is also practical, as the wires are all well protected. In the few areas where the wires exit, there are quick release plugs. This means that in the unlikely scenario that one gets snagged, it will hopefully just disconnect rather than be damaged. It also means that the bike is still easily disassembled for service or travel. I really like my Sinewave usb charger, which replaces the top cap. I made this stem too, and with the integrated Garmin mount, it's really easy to use a short usb cable to charge it as I ride. No fussing with long wrapped cables, while also giving a clean and simple look. Check out the stem and you'll notice some other details; a bell mount, integrated spacers, front brake cable hanger with quick release barrel adjuster, removable faceplate that accepts the custom decaleur, and a semi hidden pinch bolt, just for fun. For me the drivetrain was an obvious choice, and I can't believe it's controversial to say this: a triple! How did these ever fall out of favor? I've got more range than a Rolhoff hub, none of the cadence problems that come with a 1x system, and I have great chainline! Remember chainline??? I've got a Takagi Tourney XT crankset. Takagi was a Japanese crank maker that Shimano acquired in the 80s to make their cranks, and they adopted some of Takagi's group names, albeit not exactly. So I'm amused to have a Tourney that is also an XT. This crank is old enough to be made for an asymmetric spindle. The way around this is to install a 73 mm bottom bracket cartridge in a 68mm shell, then use spacers to get the offset you need. I think 9 speed Shimano hits the sweet spot between durability, more compatibility (like mixing road and mountain derailleurs as I've done here), and number of useful gears. I'm a bike mechanic, so I'm obligated to love friction shifting. But unlike many of my colleagues, it's not my preference. I've tried to explain to them, a barrel adjuster is not that hard to use, YouTube can show you how. Usually I like brifters, but on a touring bike, friction can be a real life saver. These Dura-Ace bar end shifters are a good compromise. The indexing is great, but if anything ever goes wrong, I have the option of switching it to friction. It's comforting to know that I could throw on a rear wheel from a beater department store mountain bike with a 5 speed freewheel, pretty much any derailleur in the world, and the bike becomes rideable again. An Ultegra front derailleur and XT rear, (stripped, shaped and polished) complete the shifting system. From the start I knew I wanted rim brakes. I think there are actually very compelling arguments in favour of disc brakes on a touring bike. Not least of all that the breaking surface is easily replaceable, meaning a well built set of wheels could last indefinitely. Having said that, I have yet to find a combination of drop bar levers and mechanical calipers that I like, and I wouldn't mess with hydraulics on a touring bike (remember the build spec!). But the real reason I went with rim brakes, is that if I knew I would regularly spend 8 hours a day, day after day, riding this bike, I didn't want to spend that time listening to the constant sound of《ding ding ding》 as the rotor rubs the pads. Feel free to change my mind. These Dia Compe cantilevers, upgraded with salmon Kool Stop pads, are everything I could want in a brake. Not to mention, I *love* the levers. Bonus points for the stylish hangers with integrated quick releases. I made all of the racks myself, which was super fun! If anyone is interested in getting into framebuilding, making things like racks is a cheaper and lower stakes way to learn. They're made custom for this frame, so there's nothing adjustable to fiddle with. This makes them stiffer and easier to install and remove. That makes it simple to play around with different configurations, adding and removing racks to suit different needs. For an over night trip, I'd probably be fine with just the front low riders and the handlebar bag. If you've seen this bike around town, probably it was in commuter mode, with just the frame bag and handlebar bag and rack. Speaking of bags, you can see a bizarre mix here. The only ones I bought new are the Atwater Jellybean saddle bag and the custom frame bag. When touring, the frame bag holds tent poles. When riding around town, it holds my flat kit. The rest of the bags I bought used, with the vintage panniers being tried and tested classics. My beloved Acorn handlebar bag rounds it all out. I really love the versatility of the rando style bag. It gives me easy access to my phone, wallet, sunglasses, snacks, raincoat, u-lock, a sweater, anything really! That means my pockets are empty and I'm enjoying the ride. For the finish, I wanted to keep things simple. I chose powdercoating for the durability, and Johnny from Insayne Kustomz did a great job of keeping the coats thin so the detail of the lugs wouldn't be lost. I picked the colour using the pandemic era logic of "I'll take the colour you've got in stock", and I'm glad I did. The only decal I've got on the frame is this small graphic stating it's origin: "Made by settlers in Tiohtià:ke, unceded Kanien'kehá:ka Territory". This was sort of my answer to the more common "made in Montreal". I can understand why people are excited about things that are made in their own community, by people they know, and the personal touches that make it so special. So I wanted to acknowledge that without erasing the truth of this land, and the colonial violence that continues here. I think this modest gesture is also an example of how a bike like this can express things beyond just cycling preferences. It can also express my beliefs and values. I spent so much time working on this bike, and there's so much more I could say about all of the details. The double top tube, custom chainslap protector, homemade light mounts, stainless seatstay caps, and we haven't even talked about the hand cut lugs! My favorite thing on the bike? The Palestine flag reflector that Harry from Bikecrud made. Free Palestine! I plan on building more frames, just for fun, and recently completed my second one. And in case you were wondering, yes, the fact that I made it myself does make it more fun to ride! photos by Troy (@killiskii )