

- All
- acier
- All-City
- all-rounder
- ATB
- atlantis
- B/01
- Bassi
- Bassi Rachel
- Bianchi
- Bikepacking
- Bloomfield
- Boyaca
- brooks
- Campeur
- Cannondale
- cardiff
- carradice
- Clydesdale
- commuter
- Conversion
- Coyote
- Cross-Check
- Crumbworks
- Crust
- Cyclotourisme
- dynamo
- fixe
- fixed-gear
- fixie
- Framebuilding
- Grateful Dead
- Green Thing
- GT
- HardRock
- Hillibike
- Hog's Back
- honjo
- JJJJound
- Joe Appaloosa
- Le Montréal
- Log Lady
- lugs
- Mad Max
- Marinoni
- Minivelo
- Miyata
- Mono-vitesse
- Moth bar
- Neutrino
- newbaums
- nitto
- NJS?
- panaracer
- piste
- polyvalent
- Rachel
- randonneur
- randonneuse
- Ratio
- retro
- rivbike
- Rivendell
- Road
- road bike
- Rockhopper
- Roma Tokyo
- Roma-Tokyo
- shellac
- Single speed
- Specialized
- Staff Bike
- Staff Bikes
- steel
- Sturmey Archer
- Surly
- Surly Straggler
- Tarck Biek
- touring
- Touring bike
- Townie
- track
- Track Bike
- Vélo d'hiver
- Vélo de l'équipe
- Vélo de piste
- Velo Orange
- Vélos de l'équipe
- Vintage
- Vintage MTB
- Winter Biking
- winterbike

Vince's Mutt
In the winter of 2023, Jean-Daniel and I went to Tucson, Arizona to take a framebuilding class with framebuilder Dave Bohm of Bohemian Cycles, and this is the frame I made during that class. It’s basically a Hog’s Back with a few tweaks. At the time, I didn’t have a need for a specific type of bike I didn’t already have (I know I know, n+1 blah blah blah), so I thought it would be a good exercise to start from a bike I know very well and make subtle changes to see how big of a difference it would make. I think I’m a bit of an empiricist: even though I read just about everything that exists on framebuilding, I still have to test it myself to really believe it, or really understand it at least. Since building the frame I’ve only had the chance to use it in its intended environment on a handful of weekenders. This winter, though, I was lucky enough to go test it on 800km of Colombian trocha (the common word the Colombians use for their dirt roads). So, two years later, I’m glad I can finally give it a proper review and assess how different it is from the Hog’s Back. To begin with, there wasn’t much I wanted to change from my beloved Hog’s Back. A couple of millimeters here and there to better fit my body proportions and a switch to thru-axle and adjustable dropouts were the main modifications I had in mind when designing the frame. Then I wanted to experiment a bit with one aspect of frame design that still feels a little esoteric to me, and that is front-end geometry. The Hog’s Back, with its relatively low trail measurement (63mm or so?) always felt a tad twitchy when unloaded, but very stable with the slightest weight at the front. But then most bikepacking bikes nowadays tend to have longer trails, closer to mountain bikes. I was curious to see what that was all about, so for the Mutt I decided to go with a slacker 70deg head tube angle, which bumps up the trail to 80mm, with the fork having a similar rake to the Hog's Back's. Then the slacker head tube paired with the slightly steeper seat tube allowed me to lengthen the reach (and, by extension, the front-center) to accommodate my long arms. This also resulted in a bigger front triangle for a framebag, despite the lowered top tube. The rear got a little longer too, mostly because of limitations in chainstay options, now going from about 445mm to 460mm. Those few alterations made the bike considerably longer, with the wheelbase clocking at 1128mm with the dropouts at the rearmost position. What do all these numbers mean when riding the bike? Let’s just say some changes I feel were for the best, while others not so much. First off, I don’t think I’m a fan of longer trails after all. Although the bike does feel more stable, I did notice it’s a little slower to steer, and the front wheel tends to be floppier when climbing. Is it drastic? Not really, I easily got used to it, but it’s enough of a difference for me to know that I prefer low(ish) trails. That being said, the bike felt incredibly stable bombing down those dirt roads, probably thanks to both the high trail and the pretty long wheelbase, and still felt nimble when needed. The longer rear-end didn’t seem to bother me at all. The rear wheel did slip a couple of times when climbing standing up, but I think it had more to do with the steepness of the hills rather than lack of weight on the rear wheel. And I don’t know about you, but if I'm climbing for two or three hours straight, I much prefer staying seated anyway. I guess those few lil’ “experiments” turned out pretty conclusive, in the sense that I learned a bit more about what I like and don’t like. In the next iteration of this frame the goal would be to maintain a similar wheelbase with a lower trail, probably by simply increasing the fork rake. In terms of features, I already mentioned the switch to thru-axle, which I’m very glad I did. While I don’t consider it to be a big deal, disc brakes with QR’s are a bit of a hassle, and I noticed less disc rubbing in the front when pedaling standing up. I opted for Paragon Machine Works adjustable dropouts because I always like to have the option of going singlespeed. I put pretty much all the eyelets you would expect for a bikepacker, and even tried fitting cargo cages on the seatstays but the result isn’t very convincing. They don’t have quite enough heel clearance for anything bigger than a normal water bottle, so I never really use them. Now on to the tubing. The steel tube selection was limited by what Dave had on hand and what could be ordered last minute. The tubing for my frame ended up being a mix of Dedacciai and Velospec, nothing too fancy, with tube profiles pretty similar to the Hog’s Back's Cromor. Except! The fork blades are from the prestigious Reynolds 853 heat-treated series, paired with a Pacenti crown. The heat treatment on the blades makes a noticeable difference, making them extremely stiff yet somewhat lightweight. The complete frame turned out to be noticeably lighter than a Hog’s Back even though it is a bit bigger and has more steel, the fork probably being the main reason for that weight loss. While riding loaded, the frame felt quite comfy and compliant, without feeling squiggly, which is usually the perfect in-between you’re looking for. In the end the frame came out mostly the way I expected it. The whole process of designing the frame and building it really gave me a better sense of how different parameters impact each other and what problems you can run into and what solutions are available. Dave Bohm offers classes for all three main methods of joining steel tubes: Tig-welding, fillet-brazing and lug construction. Since I already learned the basics of Tig-welding in trade school I decided to take the fillet braze class. While most of the frame is fillet-brazed with bronze, the seat tube sleeve and fork crown allowed me to learn a bit of lug-work and brazing with silver. The rear dropouts even called for nickel-silver to be used. At first I wanted to leave the fillets raw, as I am a big fan of that look, but Dave said they need to be extremely well done for him to let students get away without filing, which is… fair. It takes time to achieve beautiful raw fillets and filing is as much a skill to learn as brazing is. I find brazing to be very pleasing to do. To me it feels less stressful and more forgiving than Tig-welding. It also has that kind of romantic feel to it, more old-school and “artisanal”. There is just something about working with an open flame, and the look of those fillets, raw or filed, that speaks to me. I think both joining methods have their benefits and their applications and I’m glad I got to touch both. Now, it took a while but I finally painted the frame last spring, using Spray.Bike. Although it didn’t pan out exactly how I imagined it, my original inspiration for the colour palette was the album cover of Feeding the Abscess by Martyr, one of my all-time favorite death metal albums. Then my friend Kellyann graciously made the amazing “Mutt” logo for the downtube. It all pairs really well with my custom Gurp olive framebag, which I absolutely love. Someone I met on a group ride said the bike is giving Mad Max vibes, which made me sooo happy because that is literally the aesthetic I’m going for. I tend to see bikes as these long-lasting, highly functional and practical machines that are made to survive through the (post-)apocalypse. Now a little about the build, since some of it has changed or been thoroughly ridden out since my first write-up about my original Hog’s Back build. Thanks to hub adapters, I really just slapped all the parts onto my Mutt. My Hog’s Back had flat bars for the longest time, but I eventually realized I’m more of a dropbar kinda guy for all things touring and bikepacking. I wanted to see what all the hype was around the Crust Towel Rack, and after riding ‘em for some time I totally get it! The handlebar is very comfortable and has so many different hand positions, perfect for all-day riding. Since I’m a little picky about handlebar position, I had a custom stem made by WZRD in BC to have the bar exactly where I want it. Although there were moments in Colombia where I thought a flat bar would’ve been better suited, the wide dirt-drops never really felt like an hindrance to me and I actually liked having them on those few paved sections where I could really tuck in. Next, I switched out a couple of things on the wacky drivetrain I had going on. I found this cool Sunrace derailleur, which is the cheapest wide-range derailleur you’ll find (can do a 51t cog), and has a normal Shimano 9spd pull ratio. These are all great features but the derailleur really showed its limitations during the trip. It ended up needing almost daily adjustments to be able to reach the granny gear, the main problem being the pivots getting very grindy and needing constant lubrification. What didn’t help with that situation was the Rivendell shifter also got extra grindy. I assume the swings between extra wet and extra dry conditions were tough on the ratchet and ended up washing out most of the lubrication. It's probably not anything a good overhaul can’t fix! I’m still running the same gear ratio, 36t chainring with a 10spd 11-46 cassette, which proved to be very adequate for me, even in Colombia with 1500-2000m of climbing per day. A lower 32t chainring probably wouldn’t hurt, but I liked having a usable high gear for slight downhills or flat paved sections. The rest of the build is pretty much the same. My Klampers are still going strong, except for a little mishap right before leaving where the moving pad adjuster somehow completely stripped. So for the trip I rocked a BB7 at the back while waiting for a replacement part from Paul. “Honestly, can you see a difference?” Eh, a little. My experience with BB7 is that they have very little modulation, meaning you don’t need much to lock the wheel, which can be good at times but which I generally don't like. The Klampers have more modulation, although maybe less initial braking force. Whatever, they’re brakes, they stop. Then the wheels have… survived. I think I reached the limit of the “lightweight” Velocity Blunt SS (a racing rim, not a touring rim, as evidenced by yet another of Vince's famous mechanical mishaps —ed.) at some point through the trip by punching a dent so bad the rim cracked a little. Somehow the tire still holds air and sealant and it didn’t keep me from completing the trip (although I did inflate my tires a bit more and was a little more careful on downhills after that). Oh right, I also replaced the tire before going to Colombia, trying out Vittoria’s Barzo and Mezcal combo, in 2.3”. They felt perfect for that type of road, quite grippy without being overkill for softer surfaces. Another mishap during the trip happened to my bottom bracket, where a few ball bearings got all squished. I was expecting the IRD Tenacity open ball bearing BB to be a little tougher than that, although as some people pointed out, caged bearings aren’t as tough as loose ball bearings since you have less support. But the beauty of serviceable bottom brackets is that I just had to hitchhike to a bike shop a couple of towns over. Fresh grease and new ball-bearings were all I needed to keep going. I’ll keep the bottom bracket like this and see how the loose ball bearing theory holds up, otherwise I might switch to a good quality sealed BB. Lastly, my dynamo setup has been less than satisfying, partially by my own fault. I already had to replace the dynacoil on my Kasai FS dynamo hub after only a few years of use, but while looking into that replacement I stumbled upon the manual that very specifically says the hub should never be submerged in water, which happened repeatedly during my time living in the Maritimes. Oopsie! Then the Kasai Trailbeam light was rather disappointing since the beginning. The beam isn’t very bright, and the micro-usb port makes it almost impossible for the cable to stay in. Then the light just completely stopped working during the trip, which I know also happened to other people with much less km’s on it. All in all, the Mutt was an absolute joy to ride throughout the trip. From mountain bikey rock slabs to loose sand roads and fast paved sections, the bike felt capable of taking on any type of terrain. Not only was it very stable and capable, it was also extremely comfortable. I think this comes down to the combination of many factors: the frame geometry, the tubing, low-pressure tubeless tires, wide flexy handlebar, all this contributed to the perfect plush ride for those long 1-hour rocky downhills. The various mishaps somewhat confirmed some of my choices in components, as all of these issues were easily fixed or endured as minor annoyances. My brain is already full of ideas for the next version of this bike. That's one of my favorite thing about framebuilding and frame design: learning, tinkering and improving. Hopefully I’ll be able to get to work on that soon enough, although I also have plans for a few other frames that may come before. Bikes are cool, and building them is even cooler! Pics by Troy

Roberto's 54cm Joe Appaloosa
This is my current everyday, everything, bike. I knew I wanted a Rivendell ever since I built my wife’s Platypus. The ride quality of the Platy has been unrivalled for her and has made all sorts of outings that previously seemed out of her comfort zone not only totally doable, but also supremely enjoyable. Seeing the use Sarah quickly started to get out of her Platy, and seeing her ride it so effortlessly made Rivendell click for me. Riv frames are expensive, about as much as a high-performance, speed optimized race bike frame. However, setting aside the unsettlingly short lifespan of carbon frames, how many hours of use do performance-oriented bikes even get in a year? Riding the Riv almost every day to work not only makes my commute something to look forward to, but it inspires me to take the long way home more often than not. Slowing down, and enjoying my surroundings rather than simply smashing through them. This year, my Riv has accompanied me on countless destination snack rides, road/all-road/gravel rides, a few MTB singletrack rides and a couple glampy overnighters. Not only that, but my longest ride ever to date was aboard the Joe: an impromptu 195km jaunt when a couple companions and I decided we’d rather book it home than spend yet another night camping in the rain. Other than being soaked to the bone, the Joe kept me comfortable and in excellent spirits. I’ve used it for just about everything, there are so many thoughtful details about the frame that make what Riv say about the Joe ring true: “The Joe Appaloosa is as good an all-around bike as we make. It’s 100 percent perfect for 90 percent of the riding you’re likely to do, and 90 percent perfect for the other ten percent.” When I first built my Joe last year, it looked like this: A few things have changed since, let’s take a look! The Joe Appaloosa is one of their 2 dedicated loaded touring bikes. The other is the fabled Atlantis, but according to Riv, they’re both pretty much the same. I’ve adapted my build from the original spec in a way that’s more versatile for my everyday life. Handlebars: Nitto / Bassi Bobby bar prototype. [Available early 2025]Although I love the swoopy Magic Components Moth Bars, I found they somewhat limited what I wanted the Joe to do for me. Being someone that tends to prefer flat bars, the slightly more active position provided by the Bobby bar feels more natural to me. It’s wide and straight enough that I can stick out my elbows for better control on hairy descents and when standing on the pedals. Yet, it’s backswept enough that my wrist position feels natural and tucking in my elbows in a headwind is super comfortable. I love placing my hands right at the bends for a slightly more stretched out position. Based on the made-in-Taiwan version, these feature a 25.4mm clamp, measure 750mm wide and will come in black and silver sometime early next year. Racks: Nitto / Sim Works Obento front and Nitto Campee rear.My preference for front load-bias on other bikes these last years made me naturally want to start with a big front rack for carrying all of my needs. However, I came to learn that the Joe rides better (IMO) when the cargo weight is balanced front and rear. Simon, on the other hand, has come to prefer a front-bias on his Joe so YMMV! I just think the extra-long chainstays make a ton of sense for balancing a large saddlebag and/or paniers. Also, it seemed like a shame to not make use of the oversized M6 rear rack eyelets (a very nice touch). The Obento front and Campee rear’s versatility make them a joy to use on top of looking amazing. Yes, they’re eye-wateringly expensive, but having had the incredible opportunity of visiting Nitto last year, I knew I needed to get my hands on their expertly-crafted racks. Pedals: MKS Pretzel.I started off with Sim Works Bubblys, which are great especially for more delicate-soled footwear. I found myself pretty frequently wanting more grip, so I’m currently riding MKS Pretzels and they’ve been perfect thus far. Fenders: Honjo / Sim Works Flat 65.Ok, these were a splurge and mayyybe a little extra but they’re so pretty… They cover the 2.0” tires perfectly. My next move will be finally installing some Gurp Buddy Flaps I bought last Winter. The front fender needed a little “adjusting” to fit between the lugs of the fork crown. It was a cinch thanks to a handy-dandy Fender Adjuster I made by sanding a piece of 2x4 by wrapping sandpaper around a coffee tin that seemed to be roughly the right diameter. Some good whacks of a ball-peen hammer did the trick. I like to use the fender packaging, some rags or pieces of cardboard to mock up the fender’s position and assess any necessary adjustment to the radius. Aluminum fenders can’t be installed under tension, unlike plastic fenders, or they’ll be more prone to develop stress fractures. The final position of the fender should ideally be it’s natural resting position. Lots of tutorials use the string method for finding the fender’s centreline, but I don’t find that method to be satisfactory. Using digital calipers, I measure the actual width of the fender (which varies, especially after re-radiusing the fender), divide it by 2 and set the calipers to that dimension. Then, I lay the fender on a flat surface and use the caliper to make an etch on a piece of masking tape I put on the fender. If in doubt, I flip over the fender and repeat to validate the true center. The rest remains unchanged, lots of which was actually pillaged from my former Hog’s Back: Derailleurs: Shimano XTR front and rapid-rise rear. I first used them on my former Le Montréal, then moved to the Hog's Back before landing on the Joe Transmission: 45/36/24 x 9 speed 11-36 cassette. My favourite shift lever setup: Shimano Dura-Ace bar ends mounted on upside-down Paul Thumbies. When under the bars, they’re out of the way when I want to move my hands forward on the bars, as mentioned earlier. Friction, obv. Also initially featured on my Hog's Back Brakes: Shimano XT calipers & Avid FR-5 levers which I love. They’re cheap, have a great shape, are plenty stiff and have much less lateral play than similarly-priced levers. I’ve had these for about a decade now. Wheels: Shutter Precision front hub, Shimano LX rear hub, Sun Ringle Rhyno Lite rims, 36 Sapim Race double-butted spokes per wheel. A solid, bang-for-your buck wheelset. The Shutter Precision hub is from my former Bianchi Grizzly and has about 8 seasons and at least 5 Winters under its belt. The bearings are certainly starting to show their age, so I might be due for an upgrade! Continental Race King 29x2.0” Folding: A staple! And, as it turns out, have the low rolling resistance of much more expensive tires. The tread is highly versatile and the casing is comfy. Although these are tubeless-ready, they're not setup that way. I don’t want to deal with goopy tires on all of my bikes. Saddle: This Brooks B17 is my first leather saddle, and I’m quite happy with it! The latest batch of Joes just landed! Hit us up if you’re looking for your own forever bike.
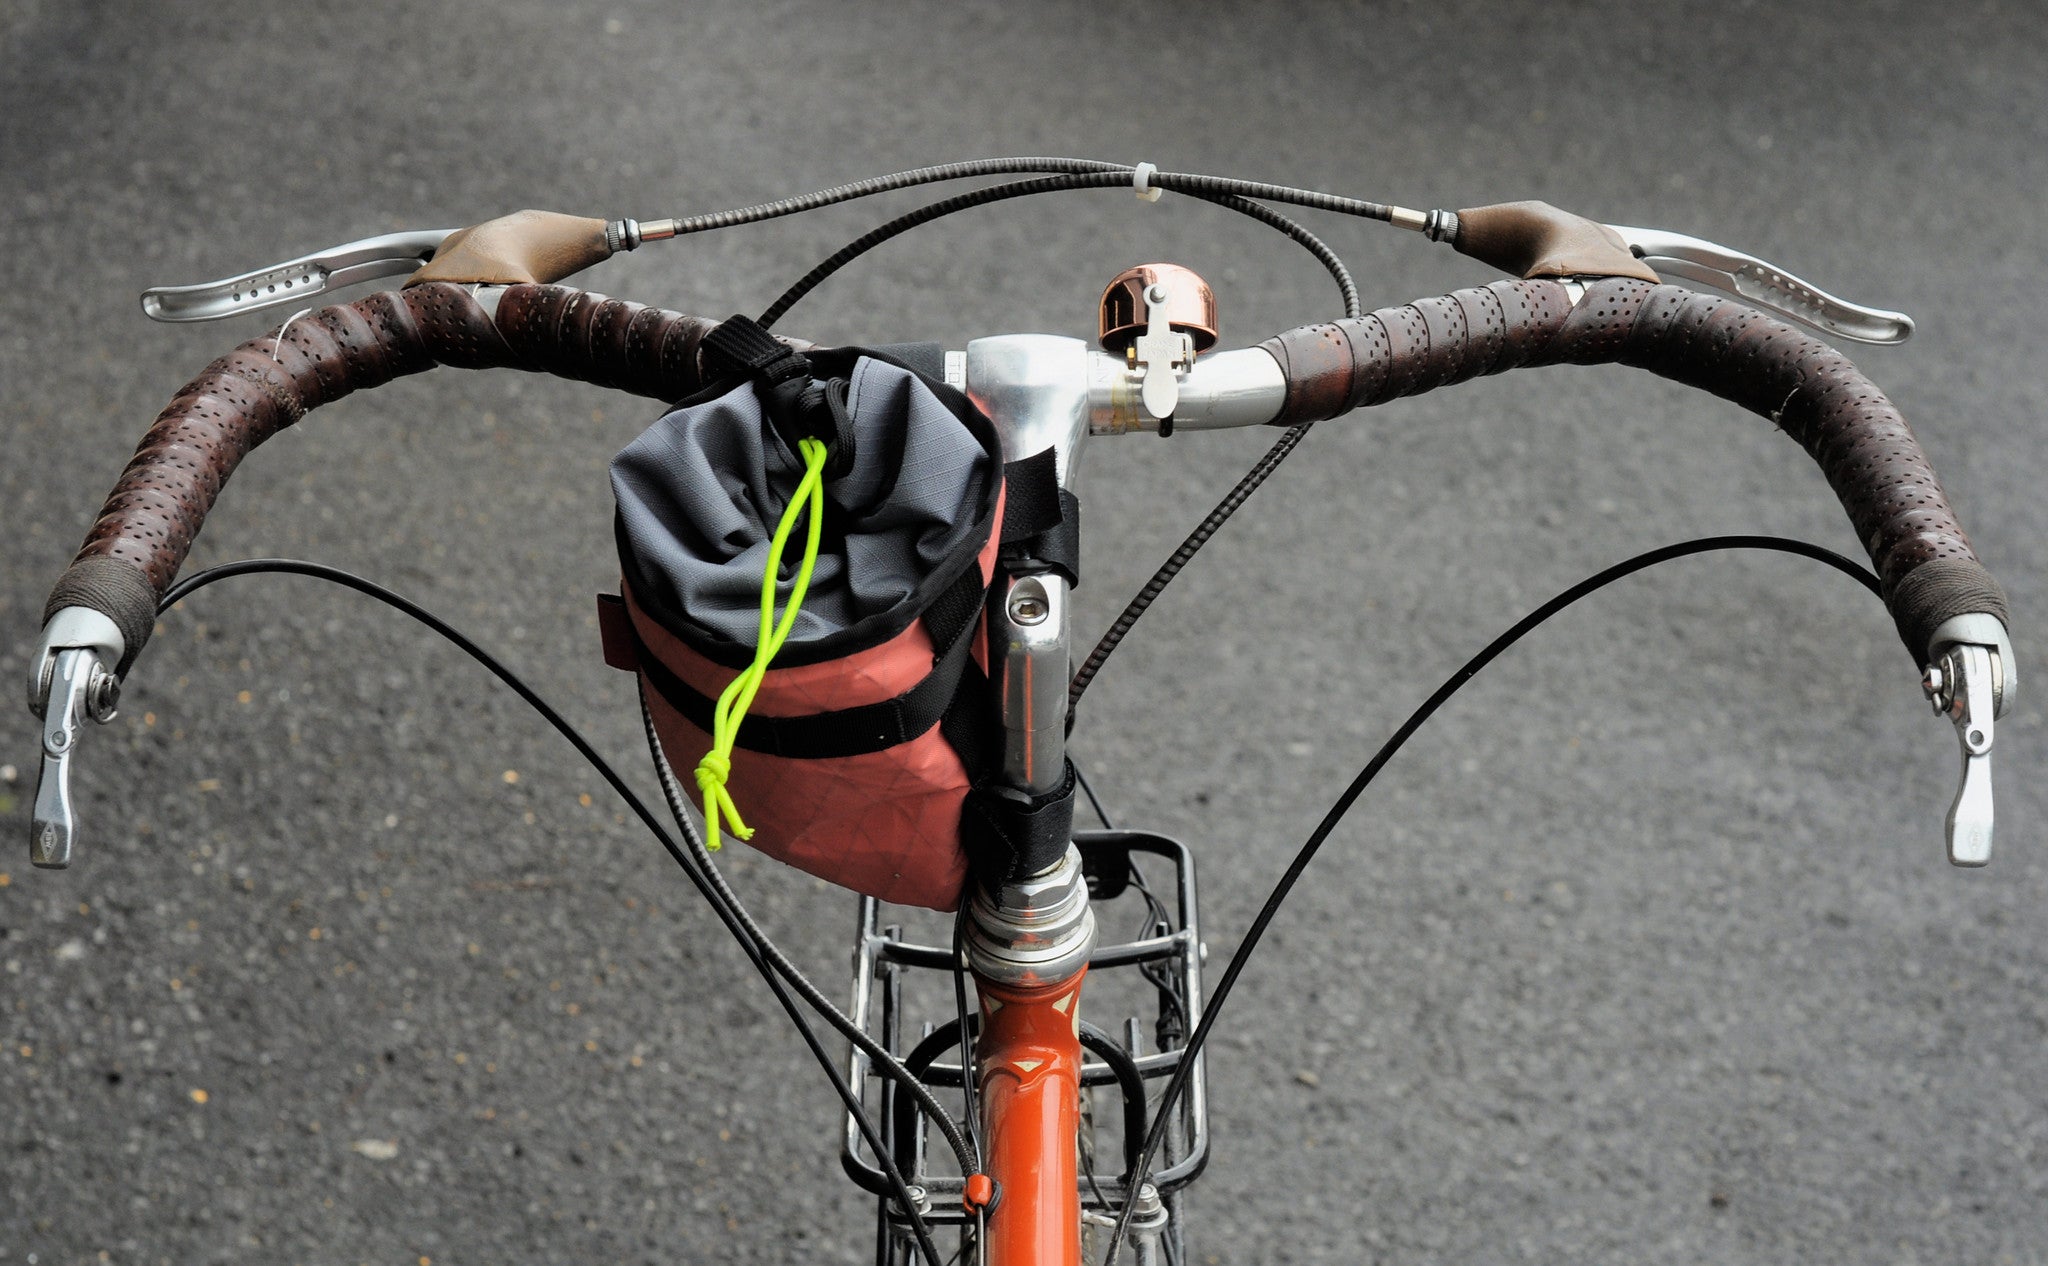
Touring Joe Appaloosa
Feel free to open images in a new tab to embiggen This Rivendell touring bike has been my dream for years. I love Riv's commitment to lugged steel, beauty in bikes, and bloody-minded practicality. It's a hell of a balancing act! Swinging into the saddle makes me feel like sinking into a comfortable couch. Rivendell's frames are meant to have you sitting up fairly upright, and perform best when you go with it, ideally with a swept-back handlebar. This, and the extremely long wheel-base, makes the bike look slow, but it absolutely is not. It gets up and goes wonderfully, shifts cleanly, and it's super-stable climbing and descending on really bad roads. You won't believe me until you try one, but please do, you'll be astonished at how these bikes feel. I've ridden this loads up north of Montreal in the Laurentians, and south in the Eastern Townships, on all kinds of roads and unmaintainted rights-of-way. Last year me and Joe went around the north and south shores of the Saint-Lawrence on a weeklong trip, and this year the plan is the VTXL. In any case, being on this bike all day feels natural, restful and encouraging. Joe Appaloosa is a worthy companion for the gentle adventures I enjoy most. Reliable and well-loved parts carried over from other bikes RD-M592, Shimano Deore Shadow 9-speed rear derailer. From my old roommate's totaled Surly that a car ruined. This is the fifth bike it's been on, and it does everything I ever ask of it without complaining. I intend to use it until it explodes, then install an identical one I've squirreled away in my parts box. The Microshift R8 double front derailer turns out to be just fine friction shifting a triple. Figures. The gold KMC X10 chain was on another bike briefly before this one. Very bling. I had to add links from another non-gold chain to make it fit Rivendell's XXL chainstays. Hplusson TB14 wheels, which used to be on a disc-brake bike, but are just as happy here. 36-hole for tradition and strength. The rear hub is Velo Orange's old 10-speed disc touring field-serviceable hub. It comes apart without tools, which so far has been mostly helpful for easy cleaning, but it's nice to know I can change a spoke without a cassette tool. Dia-Compe GC999 cantilever brakes. Pin-pads aren't as bad as you've heard to adjust. The pulley yokes are just me being deluxe. Nitto Albastache handlebars, the weirdest bars I've ever had. I knew C&L friend Peter would have a pair from his old Bridgestone. Thanks Peter! Dia-Compe non-aero brake levers. These used to be on a Noodle handlebar, and they fit amazingly on the Albastache. The incompressible brake housing was on that other disc-brake bike. Waste not, want not. The Bassi leather bar tape has been re-wrapped who knows how many times, this is their third bike and third handlebars. Tubus rear rack, because the heavy-duty rack goes where it's needed. Does panniers as well as bag-support. The rear B+M dynamo light is bolted to the rack, so it follows along too. Fresh, exciting parts added since owning the frame Nitto Dirt-Drop stem, the elegant choice for a stem you can really wail on if you need to. Trail-approved by Nitto's ultra-rigorous tests. Rivendell/Dia-Compe Silver2 shifters. These came out around when I got the frame. They're the greatest shifters ever made. Brooks B17 saddle, a sure thing. The SON dynamo hub is new, replacing a Shutter Precision which had to replace an entry-level Shimano elsewhere Kasai Trail Beam headlight, for wide beams in the woods at night. It also has a USB port to charge a battery pack. Nitto R14 rack, which is supposed to be a rear bag-support rack. It doesn't get a huge front load, mostly my lightweight sleeping gear, maybe a shirt that needs to dry from a storm. Bassi Classic Triple crank. The range is appropriately large, and perfect for touring wherever I please. MKS Grip-King (Lambda), I was riding in sandals the day before taking these pictures, so super-wide super-supportive pedals were just right. SRAM 11-36t 10-speed cassette, because I get a perverse pleasure from fritcion shifting a 9-speed derailer over a 10-speed cassette. When it's worn I'll replace it with a 9-speed, or an 8-speed, or whatever's in stock. The Widefoot Cargo cage underneath the downtube gets my Nalgene strapped to it on tour. King Cage bottle cages are my new favourite. Affordable and tough, not to mention the good looks. WTB Nano 29 x 2.1" tires. As you can tell from the cleanliness of the bike, great for mud but I like them on everything but perfectly smooth pavement, so great on most tours. Nice and grippy on gravelly climbs as well. Carradice Nelson Longflap, a laughably huge saddlebag, which fits everything necessary for a weekend tour and expands ever bigger with the Longflap folded out. The side pockets don't fit a Nalgene, but only just. Swift Gibby stem bag, this year's Campout edition in coral. I needed a bag, it was in stock, and it was a cute pink. One-handed action is really practical! Not pictured: The frame pump, a pleasure to use and quick to inflate. The beat-up Ortlieb pannier bags The fenders and smooth tires, they're pretty quick to change into for riding and touring on roads and in the rainy months. Words and pictures by me